Arepas
There’s something deeply comforting about holding a warm, golden arepa in your hands. Crispy on the outside and fluffy on the inside, these cornmeal cakes are a staple that transcends borders and brings people together. Whether stuffed with gooey cheese or shredded meat, arepas are little pockets of joy that speak the universal language of comfort food.
Behind the Recipe
My love affair with arepas started during a late-night food stroll in a bustling Venezuelan street market. The smell of toasted cornmeal, the sizzle of fillings being prepared, and the cheerful banter of food vendors created a memory I never quite shook off. Recreating that magic in my own kitchen became more than just a craving, it became a ritual. Every time I make arepas, I’m transported right back to that street corner, smiling and hungry.
Recipe Origin or Trivia
Originating from the indigenous peoples of pre-Columbian South America, arepas have deep roots in both Venezuelan and Colombian cuisines. The word “arepa” is believed to come from the indigenous term “erepa,” meaning corn. Over time, each region developed its own spin on the beloved dish. In Venezuela, arepas are often split and filled with meats, cheeses, or beans. Colombians usually serve them thinner and plainer, often with butter or cheese on the side. What remains unchanged is the central ingredient, masarepa, a precooked cornmeal that gives arepas their unique texture.
Why You’ll Love Arepas
Trust me, once you try these, they’ll become a go-to in your kitchen.
Versatile: You can stuff them with anything from cheese to avocado or scrambled eggs.
Budget-Friendly: Made with simple, inexpensive ingredients you likely already have.
Quick and Easy: Ready in under 30 minutes, no oven required.
Customizable: Go sweet or savory, small snack or full meal.
Crowd-Pleasing: A perfect party food everyone can build to their taste.
Make-Ahead Friendly: Mix the dough in advance and cook when needed.
Great for Leftovers: Excellent for repurposing last night’s shredded chicken or beans.
Chef’s Pro Tips for Perfect Results
When it comes to nailing the perfect arepa, a few little secrets go a long way.
- Use warm water to make the dough smoother and easier to work with.
- Let the dough rest for 5–10 minutes before shaping to hydrate properly.
- Don’t make them too thick or they’ll stay doughy in the center.
- Use a cast iron skillet for the best crispy golden crust.
- Slice them open while they’re still warm for easier stuffing.
Kitchen Tools You’ll Need
You don’t need a fancy setup to make great arepas, just a few basics.
Mixing Bowl: For combining the dough.
Cast Iron or Nonstick Skillet: Helps achieve that perfect crispy crust.
Spatula: To flip them without squishing.
Serrated Knife: For slicing them open if stuffing.
Kitchen Towel: To keep finished arepas warm.
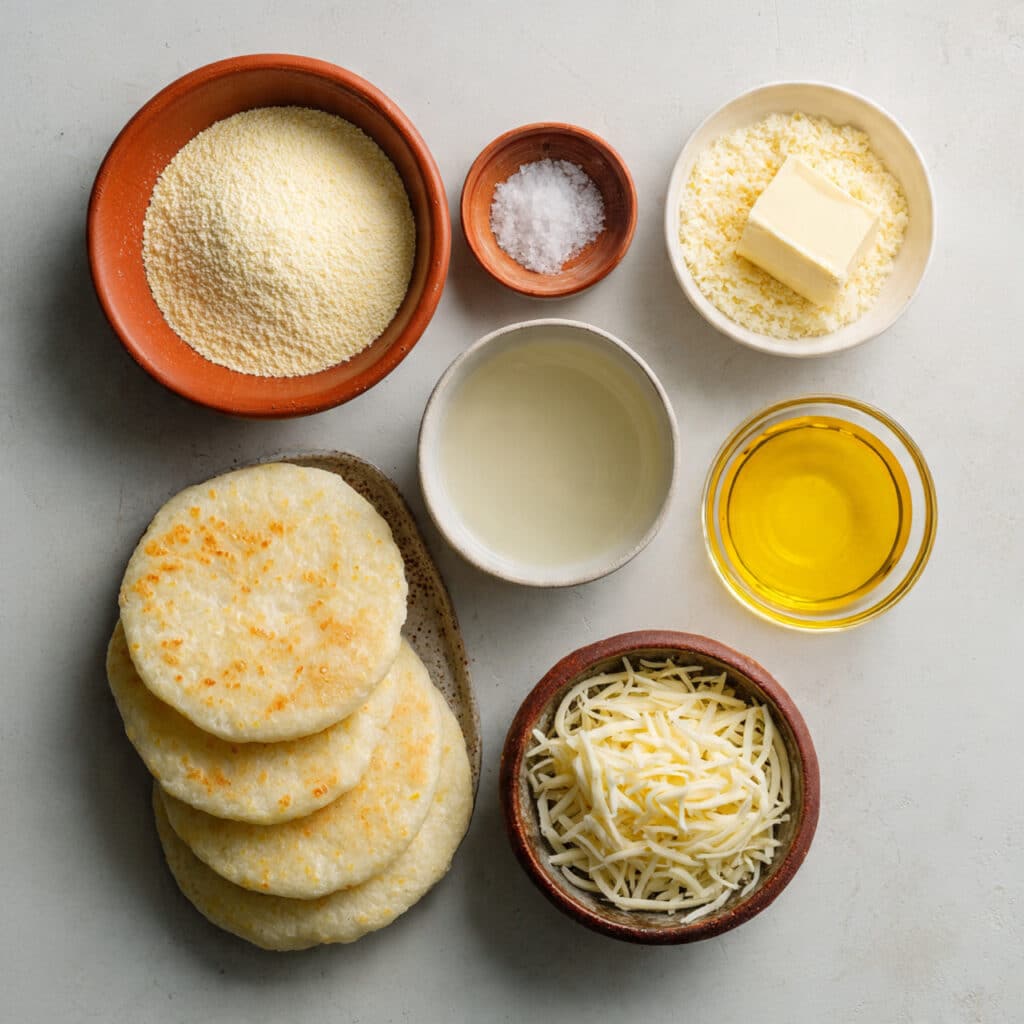
Ingredients in Arepas
The ingredients come together to form something incredibly satisfying and simple.
- Masarepa (precooked cornmeal): 2 cups — The star of the show, gives arepas their signature texture and flavor.
- Warm Water: 2 ½ cups — Helps hydrate the cornmeal into a pliable dough.
- Salt: 1 teaspoon — Enhances the natural sweetness of the cornmeal.
- Vegetable Oil: 2 tablespoons (plus extra for frying) — Adds moisture and helps get that golden crust.
- Shredded Mozzarella (optional): 1 cup — For cheese lovers, melt-in-your-mouth goodness inside.
- Butter (optional): 1 tablespoon — For brushing or mixing in for extra richness.
Ingredient Substitutions
Sometimes you’ve got to work with what’s on hand.
Masarepa: Cornmeal is not a substitute. Only use precooked white or yellow masarepa. Look for brands like PAN.
Mozzarella: Use queso blanco or cheddar for a twist.
Vegetable Oil: Swap with canola or olive oil.
Butter: Coconut oil or ghee works if you’re avoiding dairy.
Ingredient Spotlight
Masarepa: This is not your average cornmeal. Masarepa is precooked, dried, and ground which gives it a fine, soft texture perfect for forming into pliable dough.
Mozzarella: This cheese melts beautifully and adds a stretchy, creamy bite inside each arepa.
Instructions for Making Arepas
Making arepas is like molding edible little pillows. Here’s how to bring them to life:
- Preheat Your Equipment:
Heat a nonstick or cast iron skillet over medium heat. Add a thin layer of oil and allow it to shimmer. - Combine Ingredients:
In a large bowl, mix masarepa and salt. Slowly pour in warm water while stirring. Add oil. Let sit for 5 minutes, then knead into a smooth dough. - Prepare Your Cooking Vessel:
Once the skillet is hot, reduce heat slightly. Lightly oil your hands and form dough into palm-sized discs, about ½ inch thick. - Assemble the Dish:
If using cheese, place a small amount in the center of each disc, pinch closed, then flatten again gently. - Cook to Perfection:
Place arepas in the pan. Cook for 5–6 minutes on each side or until golden and crisp. Don’t rush, let them get that nice crust. - Finishing Touches:
Transfer cooked arepas to a towel-lined plate. Let rest for 2 minutes. - Serve and Enjoy:
Split open with a serrated knife and stuff with your favorite fillings or enjoy them as-is with butter.
Texture & Flavor Secrets
The crust on a well-made arepa gives way to a soft, tender interior. That contrast is what keeps you coming back bite after bite. The flavor is slightly nutty from the corn, with a mild sweetness that pairs beautifully with both savory and sweet fillings.
Cooking Tips & Tricks
Let’s make your arepas shine:
- Use warm water to help the dough absorb evenly.
- Don’t overstuff, especially with cheese, or it might leak while cooking.
- Resting the dough is not optional, it makes a huge difference.
- If you want extra crispy arepas, finish them in a 400°F oven for 5 minutes.
What to Avoid
Avoid these easy-to-make mistakes:
- Don’t skip the resting step: Your dough will be dry and crumbly.
- Don’t use regular cornmeal: It will never hydrate properly.
- Don’t rush the cooking: Low and slow gives that crisp golden exterior.
- Don’t overcrowd the pan: Give each arepa room to breathe.
Nutrition Facts
Servings: 6
Calories per serving: 210
Note: These are approximate values.
Preparation Time
Prep Time: 10 minutes
Cook Time: 20 minutes
Total Time: 30 minutes
Make-Ahead and Storage Tips
Arepas are a dream when it comes to make-ahead flexibility. You can mix and shape the dough, then refrigerate it for up to 2 days. Cooked arepas can be stored in an airtight container at room temperature for a day or in the fridge for 4 days. To reheat, pop them in the oven or toast them in a dry skillet. You can also freeze uncooked patties and cook from frozen with a few extra minutes.
How to Serve Arepas
The beauty of arepas lies in their versatility. Fill them with shredded chicken, black beans, avocado, scrambled eggs, or simply a thick slice of fresh cheese. Serve them alongside guacamole, sour cream, or hot sauce for extra flair.
Creative Leftover Transformations
- Arepa Breakfast Sandwich: Reheat, slice, and stuff with egg and avocado.
- Mini Pizza Arepas: Top with marinara and cheese, broil until bubbly.
- Soup Dunkers: Slice into wedges and use as crispy dippers for stew.
Additional Tips
- Knead your dough with love, not force.
- If the dough cracks, add a splash more water.
- Add herbs or spices directly into the dough for fun twists.
- Want fluffier arepas? Add 1 tablespoon of baking powder.
Make It a Showstopper
Brush your cooked arepas with butter and a sprinkle of sea salt. Add a dollop of colorful sauce like guasacaca or pink garlic aioli. Serve stacked in a warm napkin-lined basket. The layers and golden edges will do the rest.
Variations to Try
- Sweet Arepas: Add 1 tablespoon sugar and a handful of shredded coconut.
- Stuffed with Beans and Plantains: A classic Venezuelan combo.
- Cheesy Jalapeño: Mix diced jalapeños and cheddar into the dough.
- Arepas de Pabellón: Shredded beef, black beans, and plantains inside.
- Breakfast Arepas: Egg, ham, and cheese layered like a sandwich.
FAQ’s
Q1: Can I use regular cornmeal instead of masarepa?
No, regular cornmeal won’t work. You must use precooked masarepa.
Q2: Can I bake arepas instead of frying?
Yes, bake at 375°F for about 25 minutes after searing both sides.
Q3: How do I know when they’re done cooking?
They should be golden brown and sound hollow when tapped.
Q4: Can I freeze uncooked arepas?
Absolutely. Shape them, wrap individually, and freeze for up to 2 months.
Q5: Why is my dough cracking?
It’s too dry. Add a splash of warm water and knead again.
Q6: Are arepas gluten-free?
Yes, masarepa is naturally gluten-free.
Q7: What’s the difference between masarepa and masa harina?
Masarepa is precooked, masa harina is not. They’re not interchangeable.
Q8: Can I make mini arepas for parties?
Yes, just shape them smaller and reduce cooking time slightly.
Q9: What fillings go best with arepas?
Cheese, avocado, shredded meats, beans, eggs, or even pulled mushrooms.
Q10: Can I reheat them in the microwave?
You can, but they’re better toasted in a pan or oven for crispiness.
Conclusion
Arepas aren’t just a recipe, they’re an experience. With their warm crunch and customizable fillings, they’re the kind of food that brings people to the table and keeps them there. Whether you’re going classic or creative, this humble corn cake will win hearts and appetites alike. Try it once, and trust me, it’ll earn a permanent spot in your kitchen.
Print
Arepas
- Total Time: 30 minutes
- Yield: 6 arepas 1x
- Diet: Gluten Free
Description
Crispy on the outside and soft inside, these traditional Arepas are made from masarepa and perfect for stuffing with your favorite savory fillings. Ready in under 30 minutes, they’re a versatile and comforting dish from Latin America.
Ingredients
- 2 cups Masarepa (precooked cornmeal)
- 2 ½ cups Warm Water
- 1 teaspoon Salt
- 2 tablespoons Vegetable Oil (plus extra for frying)
- 1 cup Shredded Mozzarella (optional)
- 1 tablespoon Butter (optional)
Instructions
- Heat a nonstick or cast iron skillet over medium heat with a thin layer of oil.
- In a large bowl, mix masarepa and salt. Slowly add warm water and oil while stirring.
- Let the dough rest for 5 minutes, then knead into a smooth, pliable dough.
- Form into palm-sized discs about ½ inch thick. If using cheese, place it in the center and reshape.
- Place arepas on the skillet and cook 5–6 minutes per side until golden and crispy.
- Transfer to a towel-lined plate and rest for 2 minutes.
- Split open and fill with your favorite ingredients or enjoy plain.
Notes
- Use warm water for easier dough mixing and better texture.
- Masarepa is not the same as regular cornmeal or masa harina.
- Finish cooked arepas in the oven for extra crispiness.
- To freeze: shape raw arepas and wrap individually for up to 2 months.
- Prep Time: 10 minutes
- Cook Time: 20 minutes
- Category: Main Dish
- Method: Pan-Fried
- Cuisine: Venezuelan, Colombian
Nutrition
- Serving Size: 1 arepa
- Calories: 210
- Sugar: 0g
- Sodium: 280mg
- Fat: 9g
- Saturated Fat: 2g
- Unsaturated Fat: 6g
- Trans Fat: 0g
- Carbohydrates: 28g
- Fiber: 3g
- Protein: 4g
- Cholesterol: 5mg
Keywords: Arepas, Venezuelan food, Colombian street food, gluten free, cornmeal cakes