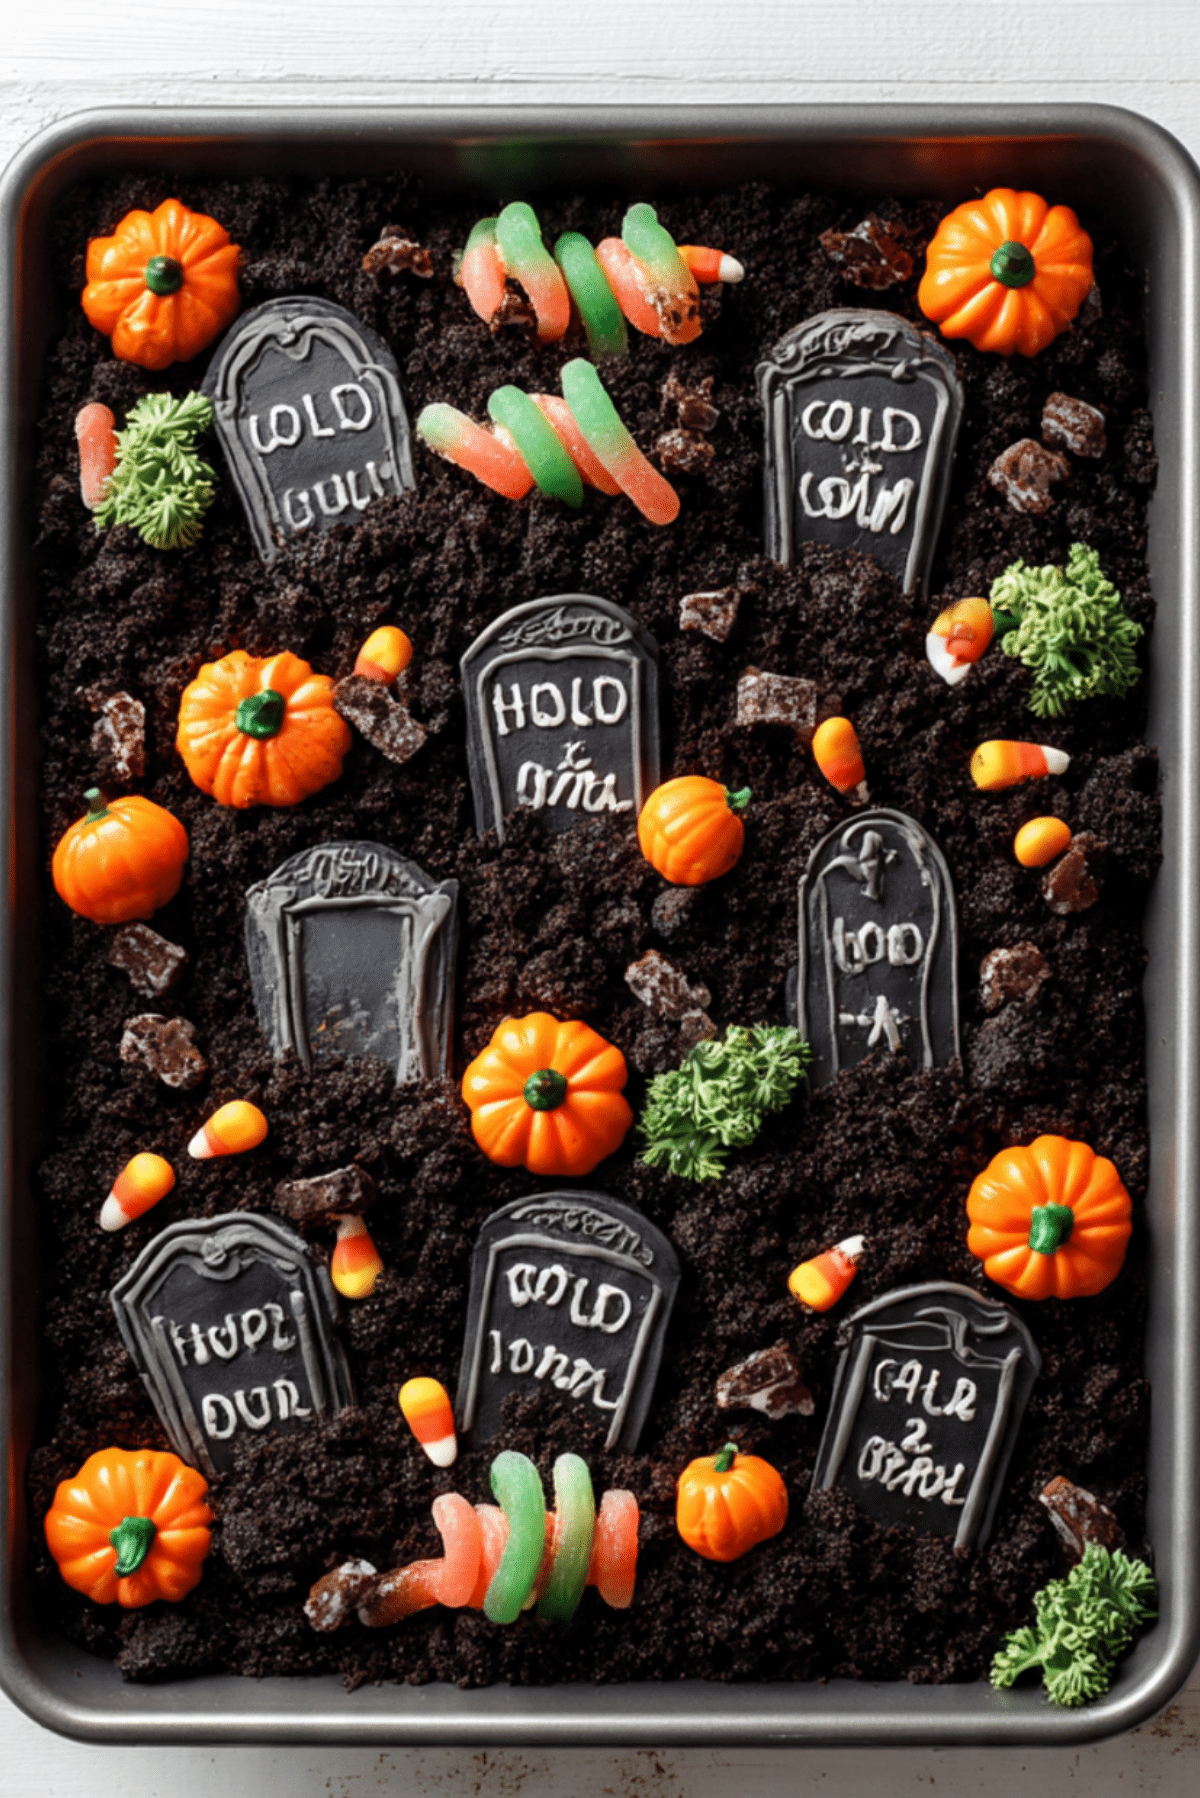
Halloween Graveyard Cake
There’s something magical about baking a cake that feels like a spooky story coming to life. This Halloween Graveyard Cake is rich, chocolatey, and creepy in the best way. From the crushed cookie “dirt” to the gummy worms and tombstone cookies, every layer adds a touch of eerie fun. It’s the kind of dessert that instantly becomes the centerpiece of your Halloween celebration, turning heads and sparking conversations before the first slice is even served.
Behind the Recipe
Every October, I find myself craving a dessert that’s not just delicious but also dressed up for the season. One chilly fall afternoon, while flipping through my old Halloween party photos, I remembered a cake my mom made when I was a kid. It was decorated like a graveyard, complete with cookie tombstones and candy bones. I decided to bring it back with a twist of my own — rich chocolate layers, creamy frosting, and a graveyard design that’s both spooky and sweet.
Recipe Origin or Trivia
Graveyard cakes have become a Halloween staple in American households. While there’s no ancient folklore behind them, their popularity surged thanks to Halloween-themed cookbooks and TV specials in the early 2000s. Their charm lies in their creativity. From simple cookie tombstones to intricate candy skeletons, the decorating possibilities are endless. These cakes are a playful way to bring a little edible fright to your festive table.
Why You’ll Love Halloween Graveyard Cake
This isn’t just another Halloween treat — it’s one that brings the wow factor. Whether you’re throwing a party or just baking for fun, here’s why this spooky cake should be on your must-make list:
Versatile: Use any cake flavor you like and decorate it as simply or extravagantly as you want.
Budget-Friendly: Most ingredients are pantry staples or easy to find at local stores.
Quick and Easy: The decorating might look fancy, but it’s surprisingly simple to pull off.
Customizable: Add your favorite Halloween candies or change up the design to fit your spooky style.
Crowd-Pleasing: Kids and adults alike love the combo of chocolatey goodness and fun decorations.
Make-Ahead Friendly: You can bake the cake a day ahead and decorate it just before serving.
Great for Leftovers: The cake stays moist for days, making leftovers something to look forward to.
Chef’s Pro Tips for Perfect Results
Want to take your graveyard cake from good to unforgettable? Here are a few pro tips to help you along the way:
- Chill Before Decorating: Let your cake cool completely or even chill in the fridge so the frosting goes on smooth.
- Use Piping Gel or Frosting to Anchor Decorations: This keeps tombstones and candies upright.
- Crush Cookies in a Bag: For cleaner, more controlled “dirt” topping, crush chocolate cookies in a sealed plastic bag.
- Create Depth with Layers: Build height with frosting swirls or mounds to give the graveyard some landscape.
- Add a Hint of Red Gel: For a slightly spooky touch, drip a bit of red gel icing here and there for a “bloody” effect.
Kitchen Tools You’ll Need
Before we get started, make sure your kitchen is stocked with these essentials:
Mixing Bowls: For combining dry and wet ingredients.
Electric Mixer: Makes whipping up the batter and frosting easier.
Cake Pans (9-inch rounds): The base for your spooky masterpiece.
Offset Spatula: Perfect for spreading frosting evenly.
Piping Bags (optional): Great for adding decorative touches.
Food Processor or Rolling Pin: For crushing cookies into graveyard dirt.
Decorating Tools: Tweezers or small tongs help place small candies precisely.
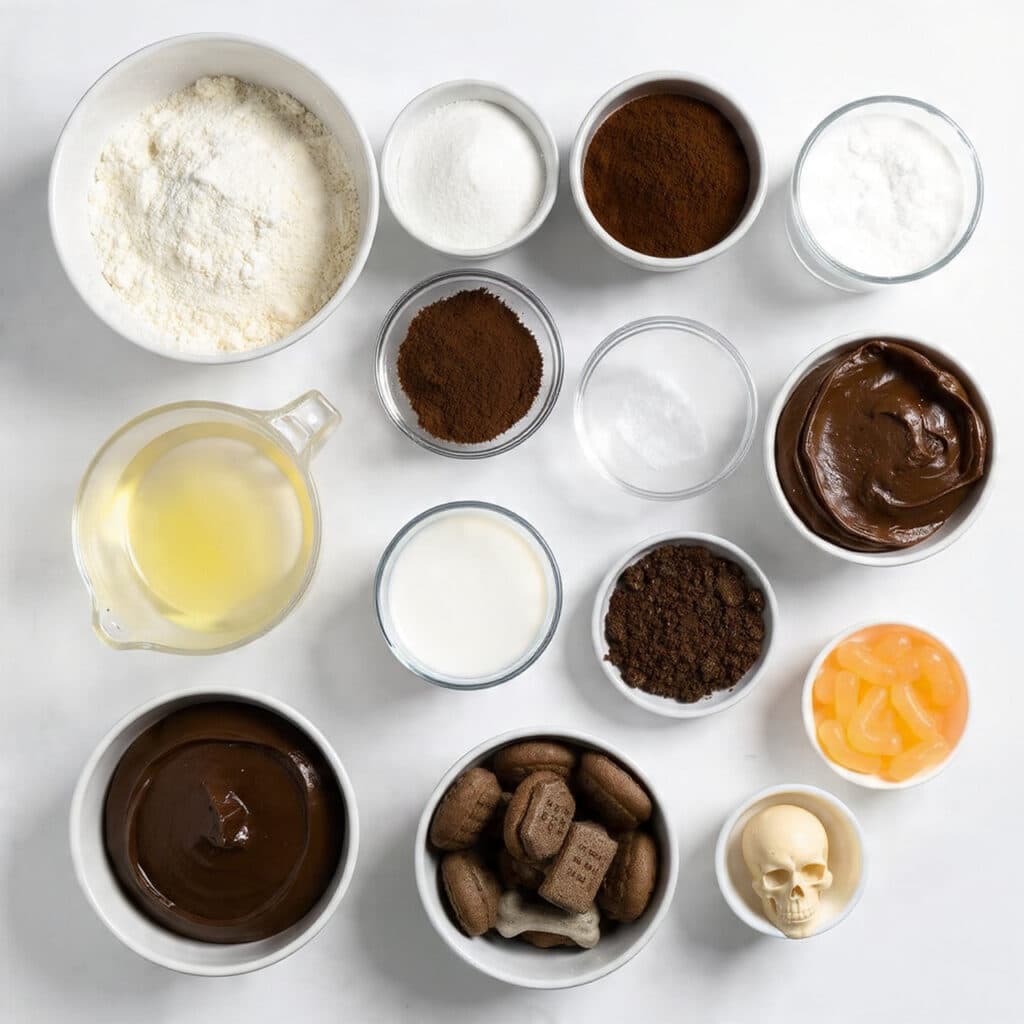
Ingredients in Halloween Graveyard Cake
This creepy cake isn’t just about looks. The ingredients come together to create a moist, flavorful base with a decorative flair that’ll have everyone going back for more.
- All-Purpose Flour: 2 cups – Gives structure and balance to the cake layers.
- Granulated Sugar: 2 cups – Adds just the right amount of sweetness.
- Unsweetened Cocoa Powder: 3/4 cup – Deepens the chocolate flavor.
- Baking Powder: 2 teaspoons – Helps the cake rise beautifully.
- Baking Soda: 1 1/2 teaspoons – Works with the cocoa for extra lift and tenderness.
- Salt: 1 teaspoon – Balances all the sweet elements.
- Eggs: 2 large – Binds the ingredients and adds richness.
- Whole Milk: 1 cup – Keeps the cake moist.
- Vegetable Oil: 1/2 cup – Adds tenderness and moisture.
- Vanilla Extract: 2 teaspoons – Rounds out the chocolate flavor.
- Boiling Water: 1 cup – Intensifies the cocoa and makes the batter smooth.
- Chocolate Frosting: 2 cups – Used between layers and as the graveyard base.
- Chocolate Sandwich Cookies: 15, crushed – Create the realistic “dirt” on top.
- Tombstone Cookies (like Milano): 6–8 – Form the spooky headstones.
- Gummy Worms: A handful – Add creepy crawly texture.
- Candy Bones and Skulls: As desired – For extra Halloween fun.
Ingredient Substitutions
No need to stress if you’re missing an item or two. Here are some easy swaps:
Whole Milk: Buttermilk or dairy-free alternatives.
Vegetable Oil: Canola oil or melted butter.
Chocolate Frosting: Use vanilla or cream cheese frosting dyed black or dark gray.
Tombstone Cookies: Graham crackers or any rectangular cookie.
Gummy Worms: Use licorice ropes or snake-shaped candies.
Ingredient Spotlight
Unsweetened Cocoa Powder: This is what gives the cake its deep, rich chocolate flavor. It pairs beautifully with the frosting and cookie dirt.
Chocolate Sandwich Cookies: Crushed to resemble dirt, they add crunch and color that mimic real soil for that graveyard effect.
Instructions for Making Halloween Graveyard Cake
This cake is just as fun to make as it is to eat. Whether you’re going solo or bringing the kids into the kitchen, get ready for a spooktacular experience!
- Preheat Your Equipment:
Set your oven to 350°F (175°C). Grease and line two 9-inch round cake pans with parchment paper. - Combine Ingredients:
In a large bowl, whisk flour, sugar, cocoa powder, baking powder, baking soda, and salt. In another bowl, mix eggs, milk, oil, and vanilla. Gradually stir the wet mixture into the dry. Add boiling water slowly and mix until smooth. - Prepare Your Cooking Vessel:
Divide batter evenly between your pans. Tap them gently to release any air bubbles. - Assemble the Dish:
Bake for 30 to 35 minutes or until a toothpick comes out clean. Cool completely on wire racks. - Cook to Perfection:
Frost the top of one layer, stack the second layer on top, and frost the entire cake generously. - Finishing Touches:
Sprinkle crushed cookies over the top to make your graveyard dirt. Insert tombstone cookies upright, add gummy worms, and scatter candy bones around. - Serve and Enjoy:
Slice into the spooky goodness and watch everyone’s faces light up. It’s creepy, cute, and downright delicious.
Texture & Flavor Secrets
This cake is all about contrasts. The soft, moist chocolate layers melt in your mouth, while the crushed cookies add a crumbly crunch. The frosting brings in a creamy sweetness that balances the deep cocoa, and the candy toppings offer bursts of texture and sugary surprise in every bite.
Cooking Tips & Tricks
Little tricks can make a big difference in your final bake:
- Chill your cake layers before frosting to reduce crumbs.
- Use gel food coloring to tint frosting or add spooky details.
- Get creative with cookie shapes to make unique tombstones.
- Pipe “RIP” on tombstones with icing for extra flair.
What to Avoid
Keep your cake spooky but stress-free with these tips:
- Don’t frost a warm cake — it will melt the frosting and ruin the texture.
- Avoid overcrowding decorations. Give each element space to shine.
- Don’t skip the crumb coat if your frosting isn’t sticking well.
Nutrition Facts
Servings: 12
Calories per serving: 420
Note: These are approximate values.
Preparation Time
Prep Time: 25 minutes
Cook Time: 35 minutes
Total Time: 1 hour
Make-Ahead and Storage Tips
This cake is a dream when made ahead. Bake the layers a day early and store them in the fridge, wrapped tightly. Decorate the day of your event for the freshest look. Leftovers keep beautifully in an airtight container in the fridge for up to 4 days. You can also freeze unfrosted cake layers for up to 2 months.
How to Serve Halloween Graveyard Cake
Serve this cake on a black or orange cake stand for a festive touch. Add a fog machine or dry ice around the base for drama. Pair with hot apple cider, spiced cocoa, or a Halloween punch to complete the experience.
Creative Leftover Transformations
Don’t let leftovers go to waste. Here are some hauntingly good ideas:
- Cake Pops: Mix cake crumbs with frosting, roll into balls, and dip in chocolate.
- Parfait Cups: Layer cake with whipped cream and more candy in mason jars.
- Ice Cream Sundaes: Crumble over vanilla or chocolate ice cream with fudge sauce.
Additional Tips
- Let kids help decorate with safe tools — it’s a fun family activity.
- Add a dash of cinnamon or espresso powder to the batter for a flavor boost.
- For a haunted twist, add black food coloring to your frosting.
Make It a Showstopper
Make your cake stand out with glowing decorations. Try adding edible glitter, LED candles around the base, or a mini haunted house topper. Use black licorice as fencing or piping gel for creepy blood effects.
Variations to Try
- Pumpkin Graveyard Cake: Add pumpkin purée and spices to the batter.
- Gluten-Free Version: Use a 1:1 gluten-free flour blend.
- Cookies and Cream: Add crushed sandwich cookies to the frosting.
- Red Velvet Graveyard: Swap the chocolate cake for red velvet for a blood-red surprise.
- Cupcake Graveyard: Use the same idea but in cupcake form for easy serving.
FAQ’s
Q1: Can I make this cake a day ahead?
Yes, you can bake the cake layers ahead and store them unfrosted. Decorate the day you plan to serve.
Q2: What kind of cookies work best for tombstones?
Flat, oval or rectangular cookies like Milanos or graham crackers are perfect.
Q3: Can I freeze the decorated cake?
It’s best to freeze only the unfrosted layers. Decorations may not hold up well when thawed.
Q4: How do I keep the tombstones from falling over?
Use a bit of frosting or melted chocolate to “glue” them in place.
Q5: Can I use boxed cake mix?
Absolutely! Just make sure it’s sturdy enough to hold the decorations.
Q6: How long will leftovers last?
Stored in the fridge, they’ll stay fresh for about 4 days.
Q7: Can I make this recipe vegan?
Yes, use plant-based milk, egg replacer, and vegan frosting.
Q8: How do I crush the cookies?
Seal them in a plastic bag and roll with a rolling pin or pulse in a food processor.
Q9: What size cake pan should I use?
Two 9-inch round cake pans work perfectly for this recipe.
Q10: What if I don’t have candy bones?
Use mini marshmallows, white chocolate chips, or just skip them.
Conclusion
This Halloween Graveyard Cake is more than just dessert — it’s an experience. With every spooky detail and rich bite, it brings laughter, delight, and maybe a little chill to your table. Trust me, you’re going to love this. It’s festive, fun, and worth every creepy crumb.
Print
Halloween Graveyard Cake
- Total Time: 1 hour
- Yield: 12 servings 1x
- Diet: Vegetarian
Description
A spooky and delicious Halloween Graveyard Cake made with rich chocolate layers, smooth frosting, and eerie candy decorations. Perfect for Halloween parties or a fun baking project with kids.
Ingredients
- 2 cups all-purpose flour
- 2 cups granulated sugar
- 3/4 cup unsweetened cocoa powder
- 2 teaspoons baking powder
- 1 1/2 teaspoons baking soda
- 1 teaspoon salt
- 2 large eggs
- 1 cup whole milk
- 1/2 cup vegetable oil
- 2 teaspoons vanilla extract
- 1 cup boiling water
- 2 cups chocolate frosting
- 15 chocolate sandwich cookies, crushed
- 6–8 tombstone cookies (like Milanos)
- Handful of gummy worms
- Candy bones and skulls, as desired
Instructions
- Preheat your oven to 350°F (175°C). Grease and line two 9-inch round cake pans with parchment paper.
- In a large bowl, whisk together flour, sugar, cocoa powder, baking powder, baking soda, and salt. In another bowl, mix eggs, milk, oil, and vanilla. Gradually stir the wet ingredients into the dry. Slowly add boiling water and mix until smooth.
- Divide the batter evenly between prepared pans and tap gently to release air bubbles.
- Bake for 30–35 minutes or until a toothpick inserted in the center comes out clean. Cool completely on wire racks.
- Frost the top of one cake layer, stack the second layer on top, and frost the entire cake.
- Sprinkle crushed cookies over the top to resemble dirt. Insert tombstone cookies upright and arrange gummy worms and candy bones for decoration.
- Serve and enjoy your spooky Halloween treat!
Notes
- Let the cake chill before frosting for a smoother finish.
- Use piping gel or extra frosting to secure decorations.
- Get creative with your decorations using available Halloween candy.
- Make the cake a day ahead and decorate just before serving for best results.
- Prep Time: 25 minutes
- Cook Time: 35 minutes
- Category: Dessert
- Method: Baking
- Cuisine: American
Nutrition
- Serving Size: 1 slice
- Calories: 420
- Sugar: 38g
- Sodium: 350mg
- Fat: 18g
- Saturated Fat: 6g
- Unsaturated Fat: 10g
- Trans Fat: 0g
- Carbohydrates: 60g
- Fiber: 3g
- Protein: 5g
- Cholesterol: 45mg
Keywords: Halloween Cake, Graveyard Cake, Spooky Dessert, Halloween Party Recipe, Chocolate Cake