Delicious Pavlova
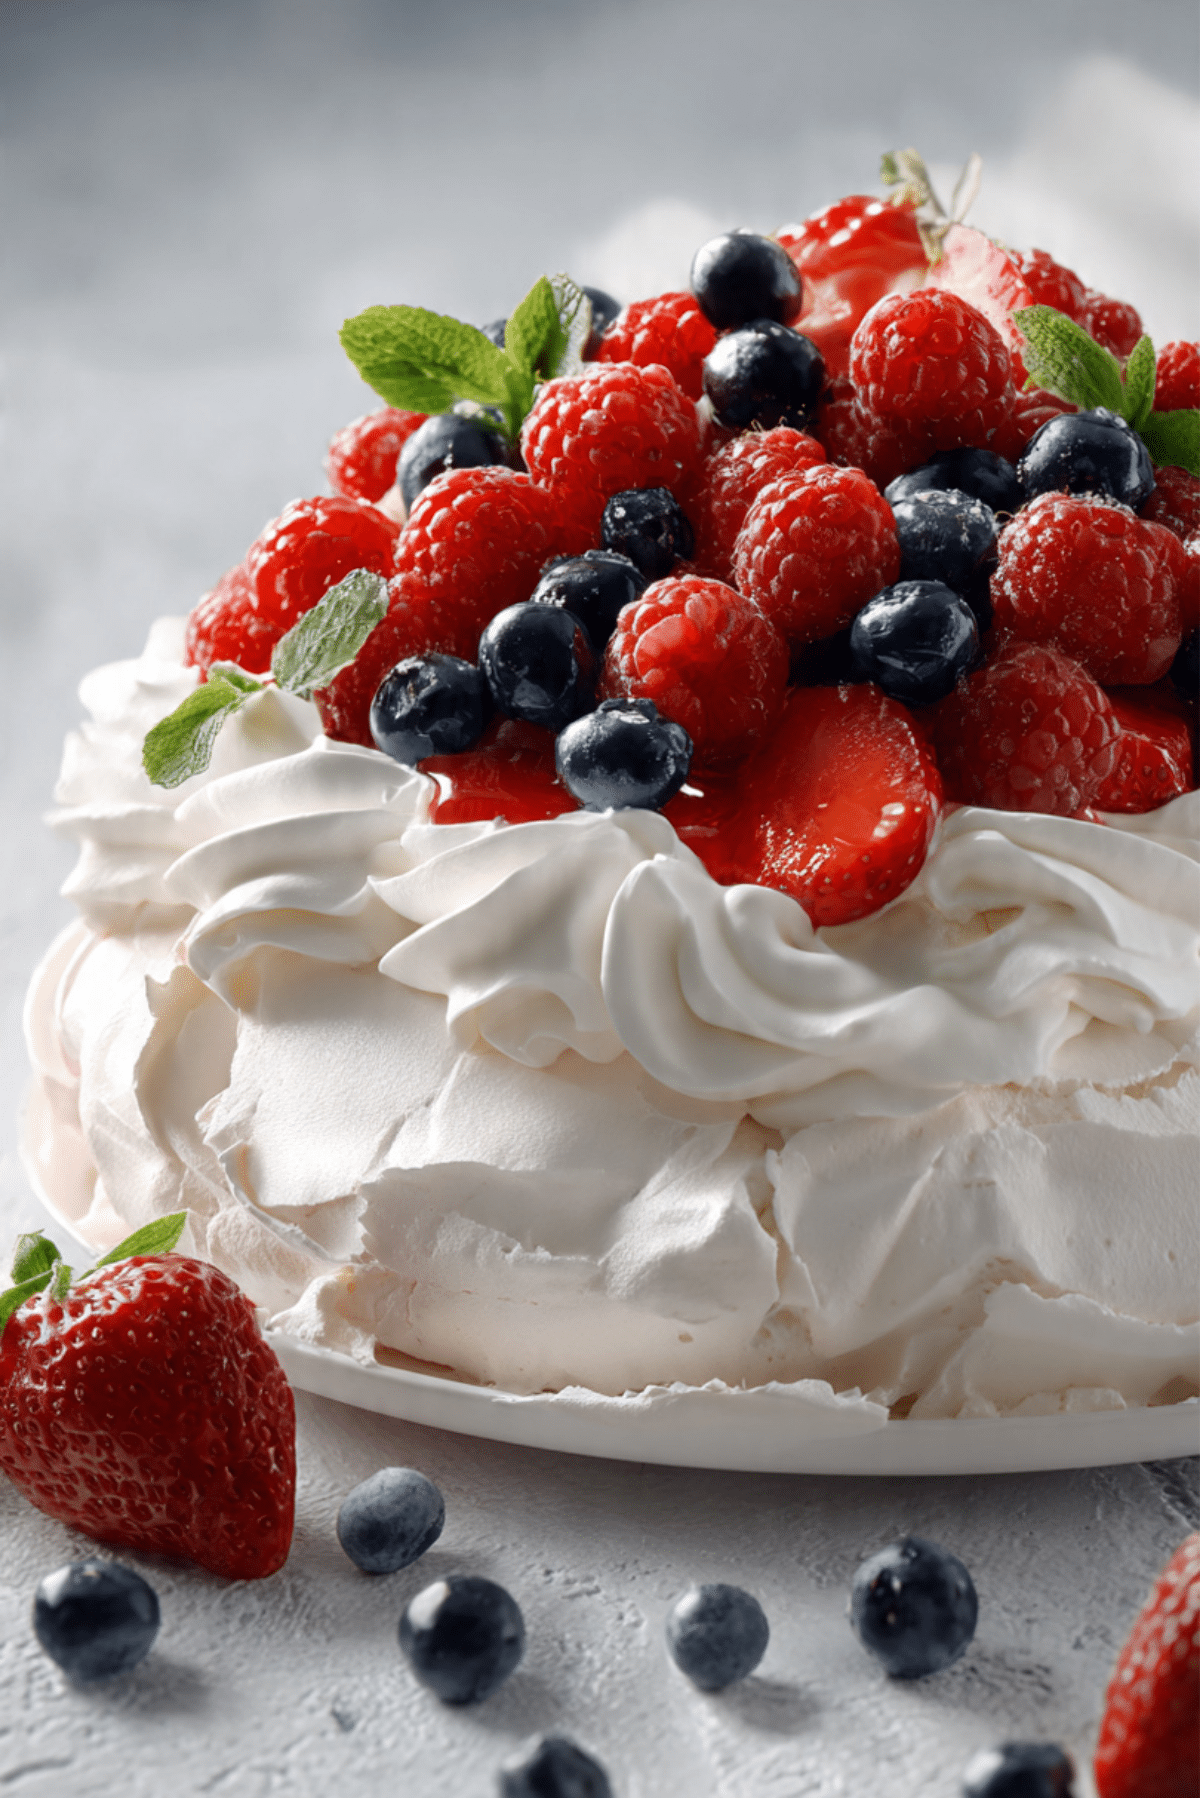
There is something magical about bringing a pavlova to the table. The crisp white shell, the cloud of softly whipped cream, and those glossy berries shining on top make it feel like a celebration even on an ordinary day. The first crack of the spoon through the crisp exterior reveals that marshmallow-like center, and trust me, you are going to love this. It is light yet indulgent, sweet yet balanced, and honestly worth every bite.
A Cloud of Sweetness That Always Steals the Show
Some desserts whisper, others make an entrance. This one absolutely makes an entrance. With its delicate crunch and pillowy middle, it feels elegant without being fussy. The contrast of textures is what makes it unforgettable, crisp on the outside and soft inside, crowned with silky cream and juicy fruit. It looks impressive, yet it is surprisingly simple when you know the rhythm of it.
And now let us dive a little deeper into where this beauty comes from.
A Sweet Slice of Culinary History
Pavlova is believed to be named after the Russian ballerina Anna Pavlova, who toured Australia and New Zealand in the 1920s. Both countries proudly claim it as their own, and honestly, it is easy to see why. Its lightness mirrors a dancer’s grace, airy and delicate, yet full of personality. Over the years it has become a festive centerpiece, especially around Christmas and summer gatherings where fresh fruit is at its best.
And that brings us to why this dessert continues to win hearts everywhere.
Why This Dessert Never Fails You
Before we step into the kitchen, let me tell you why this one is a total game changer.
Versatile: You can top it with strawberries, kiwi, passion fruit, or whatever fruit is in season, which makes it perfect all year round.
Budget-Friendly: The base uses simple pantry staples like egg whites and sugar, yet the result feels luxurious.
Quick and Easy: The prep is straightforward, and the oven does most of the work while you relax.
Customizable: You can flavor the cream, add citrus zest, or even drizzle a little fruit coulis on top.
Crowd-Pleasing: The balance of sweetness and freshness makes it loved by both kids and adults.
Make-Ahead Friendly: The meringue shell can be baked a day ahead and assembled just before serving.
Great for Leftovers: If you happen to have leftovers, they are just as dreamy the next day, slightly softer but still delicious.
Now that you are convinced, let me share a few secrets that will make your pavlova truly shine.
Chef Secrets for a Perfect Crisp Shell
Getting that perfect texture is easier than you think, especially with these tips in mind.
- Use room temperature egg whites so they whip to full volume.
- Add sugar gradually, one spoon at a time, to create a glossy and stable meringue.
- Make sure your bowl is completely clean and dry, even a little grease can stop the whites from whipping properly.
- Bake low and slow, and let it cool inside the oven to prevent cracks.
- Do not rush the cooling process, patience gives you that signature crisp exterior.
With those tips tucked in your pocket, let us gather what you need.
The Essential Tools for Success
A few simple tools make the process smooth and stress free.
Electric Mixer: Whips the egg whites to stiff, glossy peaks with ease.
Large Mixing Bowl: Gives the meringue enough space to expand properly.
Baking Sheet: Supports the meringue while it bakes evenly.
Parchment Paper: Prevents sticking and makes removal effortless.
Spatula: Helps shape the meringue into a beautiful round nest.
Now the fun part begins, the ingredients.
Ingredients You Will Need For This Classic Treat
The beauty of this dessert lies in its simplicity and how each ingredient plays a role in texture and flavor harmony.
- Egg Whites: 4 large, at room temperature, these create the airy structure.
- Granulated Sugar: 1 cup, added gradually for sweetness and stability.
- Cornstarch: 1 teaspoon, helps create that soft marshmallow center.
- White Vinegar: 1 teaspoon, stabilizes the meringue.
- Heavy Cream: 1 cup, cold, whipped into soft peaks for topping.
- Powdered Sugar: 2 tablespoons, sweetens the cream gently.
- Vanilla Extract: 1 teaspoon, adds warmth and aroma.
- Fresh Strawberries: 1 cup, sliced, for juicy sweetness.
- Fresh Blueberries: 1 cup, whole, for bursts of flavor.
And if you want to play around a little, here are some easy swaps.
Simple Ingredient Swaps If You Need Them
Sometimes you work with what you have, and that is perfectly fine.
White Vinegar: Fresh lemon juice works just as well.
Cornstarch: Arrowroot powder can be used in the same quantity.
Heavy Cream: Coconut cream for a dairy free option.
Strawberries and Blueberries: Kiwi, raspberries, or passion fruit are lovely alternatives.
Now let us spotlight the stars of the show.
The Two Ingredients That Make All the Difference
Egg Whites: They are the backbone of the dessert, creating that airy lift and crisp shell.
Granulated Sugar: Slowly dissolved into the whites, it transforms the foam into a glossy, stable structure that bakes into perfection.
And now let us dive into the cooking process itself.
Let Us Build This Beautiful Dessert Together
Take a deep breath, preheat that oven, and let us make something special.
- Preheat Your Equipment: Preheat your oven to 300°F or 150°C and line a baking sheet with parchment paper.
- Combine Ingredients: In a clean bowl, beat the egg whites until soft peaks form, then gradually add the sugar one tablespoon at a time, beating until stiff and glossy. Gently fold in cornstarch and white vinegar.
- Prepare Your Cooking Vessel: Spoon the meringue onto the lined baking sheet, shaping it into a round disk with slightly raised edges.
- Assemble the Dish: Smooth the top and create a slight well in the center to hold the cream later.
- Cook to Perfection: Reduce the oven temperature to 250°F or 120°C and bake for 60 minutes. Turn off the oven and let it cool completely inside.
- Finishing Touches: Whip the heavy cream with powdered sugar and vanilla until soft peaks form, then spoon it over the cooled shell and top with fresh strawberries and blueberries.
- Serve and Enjoy: Slice gently and serve immediately, soaking in the crisp and creamy contrast.
The Texture and Flavor Magic
The first bite is a contrast of crackly sweetness and soft marshmallow center. Then comes the cool cream, smooth and lightly sweetened, followed by the bright pop of berries. Each layer builds on the last, sweet, creamy, fresh, and slightly tangy. It is balanced and light, yet satisfying.
Helpful Tricks for the Best Results
A few small adjustments can make a big difference.
- Whip the cream just before serving so it stays fluffy.
- Assemble close to serving time to keep the shell crisp.
- Use fresh, dry berries to avoid excess moisture.
Common Mistakes and How to Avoid Them
Even simple desserts have their little traps.
- Opening the oven door too early, which can cause cracks. Let it cool slowly inside.
- Adding sugar too quickly, which can deflate the whites. Go slowly.
- Under whipping the egg whites, make sure they are glossy and hold stiff peaks.
A Quick Look at the Nutrition
Servings: 8
Calories per serving: 220
Note: These are approximate values.
Timing It Just Right
Prep Time: 20 minutes
Cook Time: 60 minutes
Total Time: 80 minutes
Make Ahead and Storage Tips
You can bake the shell a day in advance and store it in an airtight container at room temperature. Add the cream and fruit just before serving. Leftovers can be refrigerated for up to two days, though the shell will soften slightly. Freezing is not recommended once assembled.
Serving Ideas to Make It Shine
Serve it as a festive centerpiece, or make mini individual versions for dinner parties. Pair with a cup of coffee or tea for a light finish to a meal. Let me tell you, it always draws compliments.
Creative Ways to Use Leftovers
Crumble leftover pieces into parfait glasses with extra fruit and cream. Layer chunks with yogurt for a breakfast treat. Even slightly softened pieces taste amazing.
Extra Little Touches
Add a sprinkle of lemon zest over the cream for brightness. Toasted sliced almonds can add a gentle crunch. Keep everything chilled before assembling for the best structure.
Turn It Into a True Showstopper
Pile the fruit high in the center and let some gently cascade down the sides. A light dusting of powdered sugar just before serving adds elegance without overpowering the flavors.
Fun Variations to Try
- Add passion fruit pulp on top for tropical flair.
- Swirl a little cocoa powder into the meringue before baking.
- Use mango slices and mint for a summer twist.
- Add a thin layer of lemon curd under the cream for extra tang.
- Make individual mini pavlovas for personal servings.
FAQ’s
Q1: Can I make it on a humid day?
Humidity can affect meringue, so try to bake on a dry day for best results.
Q2: Why did my shell crack?
Small cracks are normal, but rapid cooling can cause larger ones.
Q3: Can I reduce the sugar?
Sugar stabilizes the meringue, so reducing it too much may affect texture.
Q4: How do I know when it is done?
The outside should feel dry and crisp to the touch.
Q5: Can I use frozen berries?
Fresh berries are best to avoid extra moisture.
Q6: Is it very sweet?
It is sweet, but the cream and fruit balance it beautifully.
Q7: Can I double the recipe?
Yes, just make sure not to overcrowd the oven.
Q8: What if I do not have cornstarch?
Arrowroot powder works well as a substitute.
Q9: How should I cut it?
Use a sharp knife and gentle pressure.
Q10: Can I flavor the cream differently?
Absolutely, almond extract or citrus zest are lovely options.
Conclusion
There is something joyful about serving a dessert that looks this impressive yet feels so light. The crisp shell, the soft center, and the fresh fruit come together in a way that feels almost magical. This one is truly worth every bite, and once you make it, you will see just how special it can be.
Print
Delicious Pavlova
- Total Time: 80 minutes
- Yield: 8 servings 1x
- Diet: Vegetarian
Description
A light and elegant pavlova with a crisp outer shell and a soft marshmallow-like center, topped with freshly whipped cream and vibrant berries. This classic dessert is airy, sweet, and perfectly balanced with fresh fruit.
Ingredients
- 4 large egg whites, at room temperature
- 1 cup granulated sugar
- 1 teaspoon cornstarch
- 1 teaspoon white vinegar
- 1 cup heavy cream, cold
- 2 tablespoons powdered sugar
- 1 teaspoon vanilla extract
- 1 cup fresh strawberries, sliced
- 1 cup fresh blueberries, whole
Instructions
- Preheat oven to 300°F (150°C) and line a baking sheet with parchment paper.
- In a clean bowl, beat egg whites until soft peaks form. Gradually add granulated sugar one tablespoon at a time, beating until stiff and glossy peaks form. Gently fold in cornstarch and white vinegar.
- Spoon the meringue onto the prepared baking sheet, shaping it into a round disk with slightly raised edges and a shallow well in the center.
- Reduce oven temperature to 250°F (120°C) and bake for 60 minutes. Turn off the oven and let the pavlova cool completely inside the oven.
- In a separate bowl, whip heavy cream with powdered sugar and vanilla extract until soft peaks form.
- Once the meringue is completely cool, spoon whipped cream into the center and top with sliced strawberries and whole blueberries.
- Slice gently and serve immediately.
Notes
- Add sugar slowly to ensure a stable and glossy meringue.
- Allow the pavlova to cool fully in the oven to prevent cracking.
- Assemble just before serving to keep the shell crisp.
- Prep Time: 20 minutes
- Cook Time: 60 minutes
- Category: Dessert
- Method: Baking
- Cuisine: Australian / New Zealand
Nutrition
- Serving Size: 1 slice
- Calories: 220
- Sugar: 24g
- Sodium: 35mg
- Fat: 10g
- Saturated Fat: 6g
- Unsaturated Fat: 3g
- Trans Fat: 0g
- Carbohydrates: 30g
- Fiber: 1g
- Protein: 3g
- Cholesterol: 30mg
Keywords: pavlova, meringue dessert, berry pavlova, classic pavlova, holiday dessert