Cauliflower Garlic Bread
There is something undeniably comforting about warm, garlicky bread fresh from the oven, especially when it is golden, cheesy, and irresistibly fragrant. Cauliflower Garlic Bread brings all the classic flavors you love while offering a lighter, wholesome twist. With its crisp edges, tender center, and rich garlic aroma, this dish feels indulgent yet nourishing at the same time. Trust me, you’re going to love this one, it is the kind of recipe that surprises everyone at the table.
A Lightened Up Favorite That Still Delivers Big Flavor
Garlic bread has always been a beloved side dish, but this version proves that comfort food can be both delicious and mindful. Made with finely riced cauliflower instead of traditional flour, it delivers a soft and satisfying texture without feeling heavy. The combination of melted cheese, fragrant garlic, and fresh herbs creates a flavor profile that is bold, savory, and utterly satisfying. This one’s a total game-changer for anyone seeking a healthier alternative without sacrificing taste.
From Classic Italian Inspiration to Modern Comfort Food
Traditional garlic bread has roots in Italian cuisine, often served alongside pasta or soups to soak up flavorful sauces. This cauliflower-based adaptation reflects modern culinary trends that celebrate vegetable-forward cooking. By transforming a humble vegetable into a golden, cheesy bread alternative, this recipe bridges tradition and innovation beautifully. Let me tell you, it’s worth every bite when served warm and fresh from the oven.
Why This Recipe Is a Must-Try
Versatile: Perfect as a side dish, appetizer, or even a light snack.
Budget-Friendly: Made with simple, affordable ingredients that are easy to find.
Quick and Easy: Straightforward steps make it ideal for both beginners and experienced cooks.
Customizable: Adjust the seasoning, add herbs, or include extra cheese to suit your taste.
Crowd-Pleasing: A delicious option for both low-carb enthusiasts and garlic bread lovers alike.
Make-Ahead Friendly: Prepare the base ahead of time and bake when ready to serve.
Great for Leftovers: Reheats beautifully and can be enjoyed the next day.
Expert Tips for Perfect Cauliflower Garlic Bread
- Remove as much moisture as possible from the cauliflower to achieve a crisp texture.
- Use freshly grated cheese for better melting and flavor.
- Bake the base before adding toppings to ensure it holds together well.
- Let the bread cool slightly before slicing to maintain its structure.
Essential Kitchen Tools You Will Need
Food Processor or Grater: For ricing the cauliflower into fine crumbs.
Clean Kitchen Towel: Helps squeeze excess moisture from the cauliflower.
Mixing Bowl: Used to combine the ingredients evenly.
Baking Sheet: Provides even heat distribution for a golden crust.
Parchment Paper: Prevents sticking and ensures easy removal.
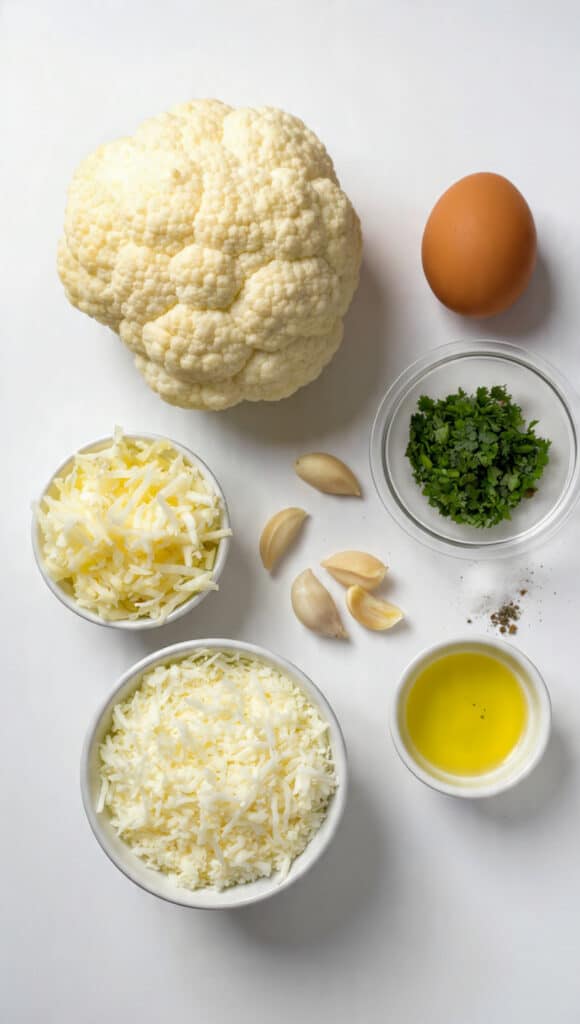
Ingredients You Will Need for This Cauliflower Garlic Bread
The harmony of these ingredients creates a perfectly balanced, savory treat.
- Cauliflower: 1 large head, riced, forms the base of the bread.
- Mozzarella Cheese: 1 cup shredded, adds creaminess and helps bind the mixture.
- Parmesan Cheese: 1/4 cup grated, provides a rich, nutty flavor.
- Egg: 1 large, acts as a binding agent.
- Garlic: 3 cloves, minced, infuses the bread with bold aroma.
- Fresh Parsley: 2 tablespoons chopped, adds freshness and color.
- Salt: 1/2 teaspoon, enhances the overall flavor.
- Black Pepper: 1/4 teaspoon, adds a subtle kick.
- Olive Oil: 1 tablespoon, helps achieve a golden crust.
Flexible Ingredient Substitutions
Mozzarella Cheese: Use dairy-free mozzarella for a lactose-free option.
Parmesan Cheese: Nutritional yeast can be used for a vegan alternative.
Egg: Replace with a flax egg for a plant-based version.
Fresh Parsley: Substitute with fresh basil or oregano for a different herb profile.
Highlighting the Star Ingredient
Cauliflower: This versatile vegetable transforms beautifully when riced and baked, creating a tender yet structured base that absorbs flavors while remaining light and nutritious.
Let’s Bring This Recipe to Life
Here are the steps you are going to follow to create this irresistible dish:
- Preheat Your Equipment: Preheat the oven to 425°F (220°C) and line a baking sheet with parchment paper.
- Combine Ingredients: Rice the cauliflower finely, then steam or microwave it for 5 minutes. Let it cool slightly and squeeze out as much moisture as possible using a clean kitchen towel.
- Prepare Your Cooking Vessel: Transfer the drained cauliflower to a mixing bowl and combine with mozzarella, Parmesan, egg, minced garlic, salt, and black pepper. Mix until well blended.
- Assemble the Dish: Spread the mixture evenly onto the prepared baking sheet, shaping it into a rectangular or oval loaf about 1/2 inch thick.
- Cook to Perfection: Bake for 20 minutes or until the edges are golden and firm.
- Finishing Touches: Brush lightly with olive oil, sprinkle fresh parsley over the top, and bake for an additional 5 minutes until golden.
- Serve and Enjoy: Allow the bread to cool slightly, slice into pieces, and serve warm.
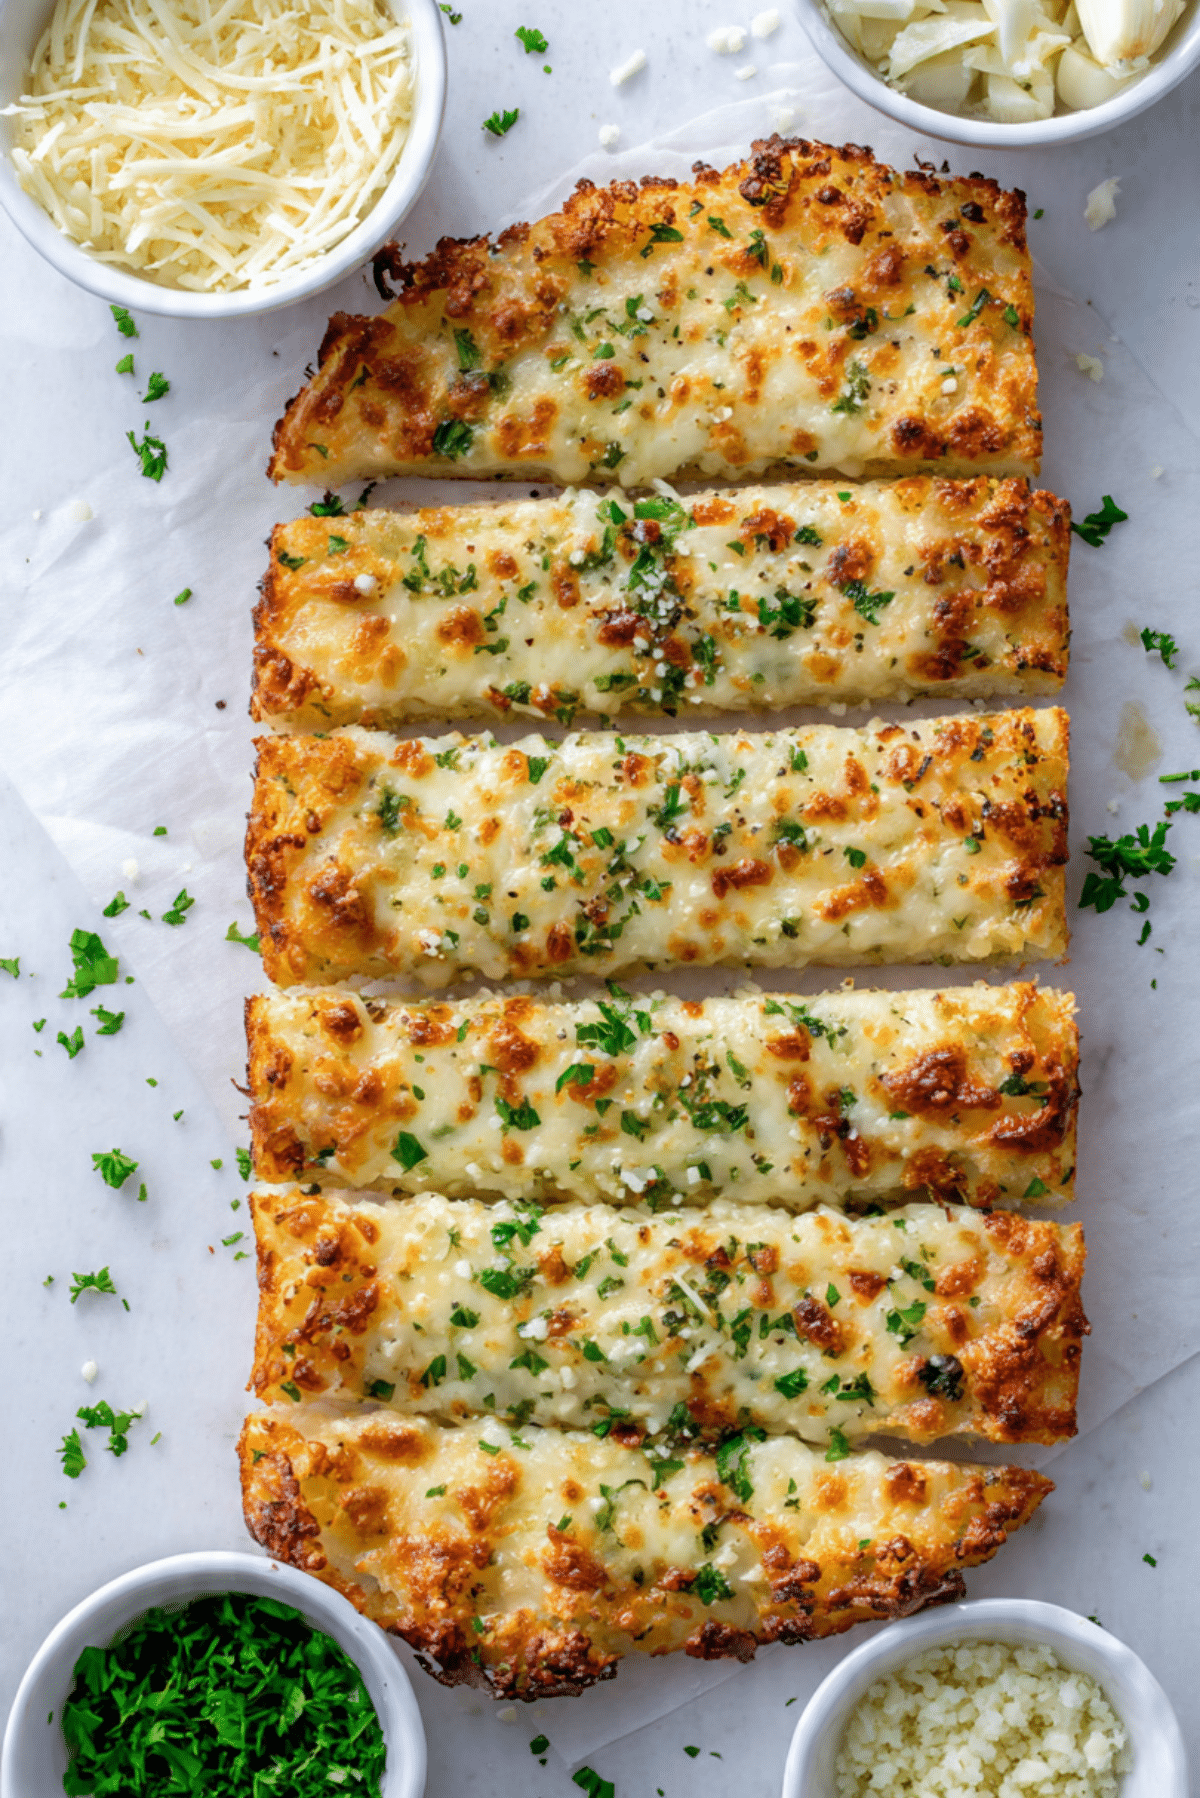
Texture and Flavor That Make Every Bite Special
This cauliflower garlic bread delivers a delightful contrast of textures. The exterior becomes lightly crisp and golden, while the interior remains soft and tender. The melted cheese creates a creamy richness, complemented by the bold aroma of garlic and the freshness of parsley. Each bite is savory, comforting, and deeply satisfying.
Helpful Tips for the Best Results
- Ensure the cauliflower is thoroughly drained to prevent sogginess.
- Use parchment paper to avoid sticking and achieve even browning.
- Slice only after cooling slightly to maintain structure.
What to Avoid When Making Cauliflower Garlic Bread
- Skipping the moisture removal step, which can lead to a soft texture.
- Overbaking, as it may dry out the bread.
- Using pre-riced cauliflower without checking moisture levels.
Nutrition Facts
Servings: 6
Calories per serving: 110
Note: These are approximate values.
Preparation Time
Prep Time: 15 minutes
Cook Time: 25 minutes
Total Time: 40 minutes
Make-Ahead and Storage Tips
Prepare the cauliflower mixture in advance and store it in the refrigerator for up to one day before baking. Leftover slices can be stored in an airtight container for up to three days. Reheat in the oven or air fryer to restore crispness. Freezing is also possible, wrap slices individually for best results.
How to Serve
Serve alongside pasta dishes, soups, or fresh salads for a complete meal. It also makes a delightful appetizer with marinara sauce for dipping. For a creative twist, top it with sliced tomatoes or extra cheese before serving.
Creative Leftover Transformations
Turn leftover slices into mini sandwiches with fresh vegetables or grilled chicken. Use them as a base for a low-carb pizza or crumble them over salads for added flavor and texture.
Additional Tips for Success
Use freshly grated cheese for the best melting quality. Adjust the garlic level according to your preference, and experiment with herbs to create your own signature flavor.
Make It a Showstopper
Serve the bread on a rustic wooden board and garnish with extra parsley for a vibrant presentation. A light drizzle of olive oil just before serving enhances both flavor and visual appeal.
Variations to Try
- Add Italian seasoning for a classic herb blend.
- Top with extra mozzarella and broil briefly for a cheesy crust.
- Mix in finely chopped spinach for added nutrition.
- Sprinkle red pepper flakes for a hint of heat.
- Add a layer of marinara sauce and cheese to create a cauliflower pizza bread.
FAQ’s
Q1: Can I make this recipe ahead of time?
Yes, prepare the mixture in advance and bake just before serving.
Q2: How do I prevent soggy cauliflower bread?
Squeeze out as much moisture as possible before mixing the ingredients.
Q3: Is this recipe gluten-free?
Yes, it is naturally gluten-free.
Q4: Can I freeze cauliflower garlic bread?
Yes, freeze baked slices and reheat in the oven for best texture.
Q5: Can I make it dairy-free?
Yes, substitute with dairy-free cheese alternatives.
Q6: What can I serve with this bread?
It pairs well with soups, salads, pasta, or marinara sauce.
Q7: Can I use frozen cauliflower?
Yes, thaw completely and squeeze out excess moisture before using.
Q8: How long will leftovers last?
Up to three days when stored in an airtight container in the refrigerator.
Q9: Can I add other toppings?
Absolutely, try herbs, extra cheese, or sliced vegetables.
Q10: Why is my bread falling apart?
It may need more moisture removal or slightly longer baking time.
Conclusion
Cauliflower Garlic Bread is a delightful fusion of comfort and creativity, offering all the flavors of traditional garlic bread with a lighter, wholesome twist. With its golden crust, cheesy richness, and aromatic garlic notes, it is sure to become a favorite in your kitchen. Whether served as a side, appetizer, or snack, this recipe proves that healthy eating can be both satisfying and delicious.
Print
Cauliflower Garlic Bread
- Total Time: 40 minutes
- Yield: 6 servings 1x
- Diet: Gluten Free
Description
A delicious low-carb alternative to traditional garlic bread, made with riced cauliflower, melted cheese, and aromatic garlic for a crispy, flavorful bite.
Ingredients
- 1 large head cauliflower, riced
- 1 cup shredded mozzarella cheese
- 1/4 cup grated Parmesan cheese
- 1 large egg
- 3 cloves garlic, minced
- 2 tablespoons fresh parsley, chopped
- 1/2 teaspoon salt
- 1/4 teaspoon black pepper
- 1 tablespoon olive oil
Instructions
- Preheat the oven to 425°F (220°C) and line a baking sheet with parchment paper.
- Rice the cauliflower and steam or microwave for 5 minutes. Allow it to cool, then squeeze out as much moisture as possible using a clean towel.
- Transfer the drained cauliflower to a mixing bowl and combine with mozzarella, Parmesan, egg, minced garlic, salt, and black pepper. Mix thoroughly.
- Spread the mixture evenly onto the prepared baking sheet, shaping it into a rectangular loaf about 1/2 inch thick.
- Bake for 20 minutes or until golden and firm.
- Brush lightly with olive oil, sprinkle with fresh parsley, and bake for an additional 5 minutes.
- Allow to cool slightly before slicing and serving warm.
Notes
- Squeeze out as much moisture as possible to ensure a crisp texture.
- Use freshly grated cheese for the best flavor and meltability.
- Reheat leftovers in the oven or air fryer for best results.
- Prep Time: 15 minutes
- Cook Time: 25 minutes
- Category: Appetizer
- Method: Baking
- Cuisine: Italian
Nutrition
- Serving Size: 1 serving
- Calories: 110
- Sugar: 2g
- Sodium: 210mg
- Fat: 7g
- Saturated Fat: 3g
- Unsaturated Fat: 3g
- Trans Fat: 0g
- Carbohydrates: 5g
- Fiber: 2g
- Protein: 6g
- Cholesterol: 35mg
Keywords: Cauliflower Garlic Bread, low carb bread, gluten free garlic bread, cauliflower bread recipe