Danish Pastry with Homemade Jam
There is something almost magical about pulling a tray of golden pastries from the oven, especially when the sweet scent of buttery layers and bubbling jam fills the kitchen. Danish Pastry with Homemade Jam is one of those treats that feels special yet comforting at the same time. The crisp edges, the tender layers, and that glossy jewel of fruit in the center, trust me, you are going to love this. It is the kind of bake that turns an ordinary morning into something memorable.
The irresistible charm of flaky layers and fruity sweetness
When you take your first bite, you get that delicate crunch from the outer layers, followed by a soft, airy interior that practically melts on your tongue. Then comes the homemade jam, slightly tangy, naturally sweet, and rich with fruit flavor. The balance is beautiful. It is not overly sugary, not heavy, just perfectly layered comfort. This one is a total game changer for brunch spreads or slow weekend breakfasts.
A little taste of Denmark in your own kitchen
Danish pastries have a long tradition in Scandinavian baking. While many people think they originated in Denmark alone, the laminated dough technique was actually inspired by Austrian bakers in the 19th century. Over time, Danish bakers refined the method, creating the iconic flaky texture we all recognize today. Adding homemade jam is a simple, heartfelt touch that keeps the pastry grounded in rustic tradition, where fresh fruit preserves were often made at home and spooned generously into baked goods.
Why this bake never disappoints
Before we roll up our sleeves, let me tell you why this pastry deserves a place in your kitchen.
Versatile: You can use different fruit jams depending on the season, from strawberry to apricot to raspberry, and each one brings its own personality.
Budget-Friendly: Basic pantry staples like flour, butter, sugar, and milk come together beautifully without expensive ingredients.
Quick and Easy: While laminated dough sounds fancy, the steps are straightforward if you follow them carefully.
Customizable: Shape the dough into pinwheels, pockets, or classic rounds, and adjust the sweetness to your liking.
Crowd-Pleasing: Buttery pastry and fruity filling is a combination almost everyone enjoys.
Make-Ahead Friendly: You can prepare the dough in advance and bake fresh the next morning.
Great for Leftovers: They taste wonderful slightly warmed the next day with a cup of coffee.
Insider secrets for bakery-style results
Now let dive into a few expert tips that make all the difference.
- Keep your butter cold but pliable so it creates distinct layers without melting into the dough.
- Chill the dough between folds to maintain those beautiful layers.
- Do not overfill with jam, a tablespoon is usually enough to avoid leaks.
- Brush gently with egg wash for a glossy golden finish.
- Bake until deeply golden, not pale, because color equals flavor.
Essential tools that make it easier
Before we start mixing, here are the tools that will help you stay organized.
Mixing Bowl: For combining dough ingredients evenly.
Rolling Pin: Essential for laminating and creating thin layers.
Baking Sheet: Provides even heat distribution.
Parchment Paper: Prevents sticking and ensures easy cleanup.
Pastry Brush: Perfect for applying egg wash smoothly.
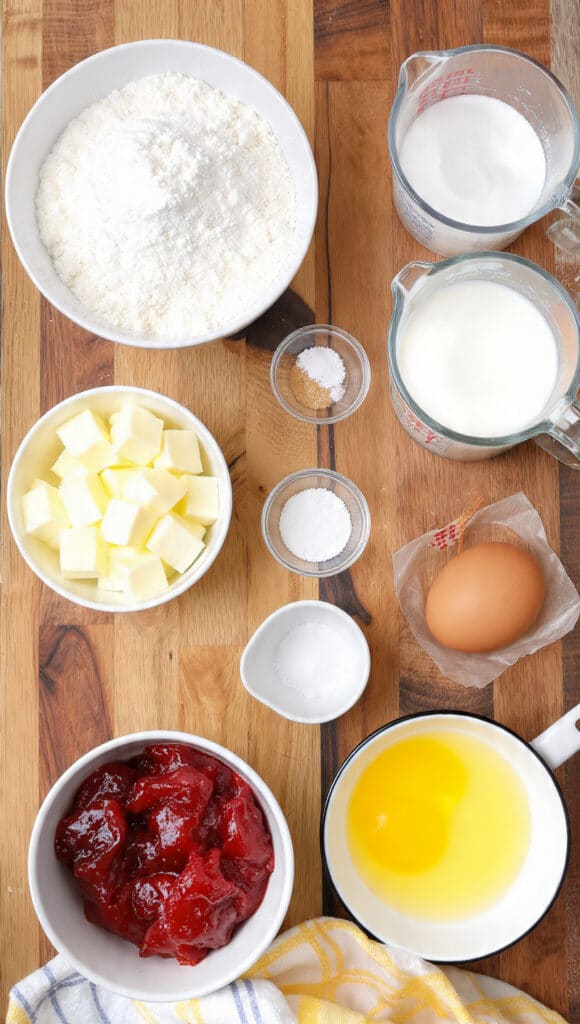
Ingredients that build flavor and texture
Let me walk you through the ingredients that bring everything together in harmony.
- All-Purpose Flour: 3 cups, provides structure and strength for layering.
- Granulated Sugar: 1/4 cup, lightly sweetens the dough.
- Active Dry Yeast: 2 1/4 teaspoons, helps the dough rise and become airy.
- Warm Milk: 3/4 cup, activates the yeast and enriches the dough.
- Unsalted Butter: 1 cup cold for laminating, creates flaky layers.
- Salt: 1 teaspoon, enhances overall flavor.
- Egg: 1 large, adds richness to the dough.
- Homemade Fruit Jam: 1 cup, thick and cooled, provides sweet fruity filling.
- Egg Wash: 1 egg beaten with 1 tablespoon milk, for brushing.
Flexible swaps if needed
Sometimes you work with what you have, and that is perfectly fine.
All-Purpose Flour: Bread flour for slightly chewier texture.
Warm Milk: Warm water with 1 tablespoon milk powder.
Unsalted Butter: Salted butter, just reduce added salt slightly.
Homemade Fruit Jam: Store-bought high quality jam.
Spotlight on two key ingredients
Unsalted Butter: This is the heart of the flaky texture. High quality butter creates distinct layers and rich flavor.
Homemade Fruit Jam: Thick, fruit forward jam prevents soggy centers and adds bright sweetness.
Let us bring it all together in the kitchen
This is where the magic happens, and it is easier than you think.
- Preheat Your Equipment: Preheat oven to 375 F and line a baking sheet with parchment paper.
- Combine Ingredients: In a bowl, mix warm milk and yeast. Let sit 5 minutes. Add flour, sugar, salt, egg, and mix into a soft dough.
- Prepare Your Cooking Vessel: Roll dough into a rectangle, place cold butter slices over two thirds, fold like a letter, then chill 20 minutes. Repeat folding process two more times.
- Assemble the Dish: Roll dough to 1/4 inch thickness, cut into squares, spoon 1 tablespoon jam in the center, and shape edges inward.
- Cook to Perfection: Brush with egg wash and bake 18 to 22 minutes until golden brown.
- Finishing Touches: Let cool slightly so jam sets and layers firm up.
- Serve and Enjoy: Serve warm with coffee or tea, and enjoy every flaky bite.
The texture and flavor journey
As they bake, the butter melts and creates steam, forming delicate layers that puff beautifully. The exterior becomes crisp and golden, while the inside stays tender. The jam thickens slightly in the oven, concentrating its fruity notes. Each bite gives you crunch, softness, sweetness, and just a hint of salt. Let me tell you, it is worth every bite.
Helpful baking tips for success
A few small details can make a big difference.
- Keep dough chilled if it becomes too soft while working.
- Use thick jam to avoid overflow.
- Space pastries apart on the tray for even browning.
- Allow them to cool briefly before serving so the filling sets.
Common mistakes and how to avoid them
Even experienced bakers run into small issues, so here is what to watch for.
- Overworking the dough can make it tough, handle gently.
- Skipping chill time reduces flakiness.
- Adding too much jam causes leaking during baking.
- Underbaking results in pale and doughy layers.
Nutritional snapshot to keep in mind
Servings: 8
Calories per serving: 320
Note: These are approximate values.
Time breakdown for planning
Prep Time: 40 minutes
Cook Time: 20 minutes
Total Time: 60 minutes
Planning ahead and storing properly
You can prepare the dough the night before and refrigerate it tightly wrapped. Baked pastries stay fresh in an airtight container for two days at room temperature. For longer storage, freeze them once cooled, then reheat in the oven until warmed through. This keeps the layers crisp.
Serving ideas that elevate the experience
Pair them with fresh berries and a spoonful of yogurt for brunch. Dust lightly with powdered sugar for a bakery look. They also shine alongside a hot cup of coffee or warm milk on a cozy morning.
Reinventing leftovers in creative ways
Slice leftover pastries and toast lightly for extra crunch. Turn them into a quick bread pudding by cubing and baking with a simple custard. Crumble over vanilla ice cream for a quick dessert twist.
Extra tips for maximum flavor
Add a touch of lemon zest to the jam for brightness. Sprinkle sliced almonds before baking for crunch. A light drizzle of simple glaze can add extra sweetness if desired.
Presentation tips that impress
Arrange them on a simple white platter and let their golden color shine. A light dusting of powdered sugar just before serving makes them look bakery fresh. Keep styling minimal so the layers and jam remain the star.
Variations to explore
Try apricot jam with sliced almonds.
Use raspberry jam with a hint of lemon zest.
Add a cream cheese filling under the jam for richness.
Shape into classic pinwheels instead of squares.
Top with a simple vanilla glaze after baking.
FAQ’s
Q1: Can I use store bought jam?
Yes, just choose a thick, high quality jam to prevent soggy pastry.
Q2: Can I freeze the dough?
Yes, wrap tightly and freeze for up to one month.
Q3: Why is my pastry not flaky?
The butter may have melted into the dough. Keep everything chilled.
Q4: Can I make it dairy free?
You can try plant based butter and milk alternatives, though texture may vary.
Q5: How do I know it is fully baked?
Look for deep golden color and crisp edges.
Q6: Can I reduce sugar?
You can slightly reduce sugar in the dough without affecting structure.
Q7: What jam works best?
Thick homemade jam with balanced sweetness works beautifully.
Q8: Can I add spices?
A pinch of cinnamon or cardamom adds warmth.
Q9: How should I reheat leftovers?
Warm in the oven at 300 F for about 5 minutes.
Q10: Can I double the recipe?
Yes, just ensure you have enough space for proper chilling and baking.
Conclusion
Baking Danish Pastry with Homemade Jam at home feels like a small celebration. The buttery aroma, the golden layers, and that glossy fruit center make it something truly special. Once you master the folding and chilling, you will see how rewarding it is. Trust me, once you taste that first flaky bite, you will want to make it again and again.
Print
Danish Pastry with Homemade Jam
- Total Time: 60 minutes
- Yield: 8 pastries 1x
- Diet: Vegetarian
Description
Flaky, buttery Danish pastries filled with thick homemade fruit jam and baked until golden brown. Crisp on the outside, tender and airy inside, and perfectly sweet in every bite.
Ingredients
- 3 cups all-purpose flour
- 1/4 cup granulated sugar
- 2 1/4 teaspoons active dry yeast
- 3/4 cup warm milk
- 1 cup unsalted butter, cold
- 1 teaspoon salt
- 1 large egg
- 1 cup homemade fruit jam, thick and cooled
- 1 egg beaten with 1 tablespoon milk for egg wash
Instructions
- Preheat oven to 375 F and line a baking sheet with parchment paper.
- In a bowl, mix warm milk and yeast. Let sit for 5 minutes until foamy. Add flour, sugar, salt, and egg, then mix into a soft dough.
- Roll dough into a rectangle. Place cold butter slices over two thirds of the dough, fold like a letter, and chill for 20 minutes. Repeat the folding and chilling process two more times.
- Roll dough to 1/4 inch thickness and cut into squares. Spoon 1 tablespoon jam into the center of each square and fold edges inward to shape.
- Brush pastries with egg wash and bake for 18 to 22 minutes until golden brown and crisp.
- Allow pastries to cool slightly before serving so the jam sets properly.
Notes
- Keep the dough chilled to maintain flaky layers.
- Use thick jam to prevent overflow while baking.
- Do not overfill each pastry, 1 tablespoon of jam is ideal.
- Reheat leftovers in the oven at 300 F for about 5 minutes to restore crispness.
- Prep Time: 40 minutes
- Cook Time: 20 minutes
- Category: Breakfast
- Method: Baking
- Cuisine: Danish
Nutrition
- Serving Size: 1 pastry
- Calories: 320
- Sugar: 14g
- Sodium: 180mg
- Fat: 18g
- Saturated Fat: 11g
- Unsaturated Fat: 6g
- Trans Fat: 0g
- Carbohydrates: 34g
- Fiber: 1g
- Protein: 5g
- Cholesterol: 65mg
Keywords: Danish pastry with homemade jam, flaky Danish pastry, homemade jam pastry, Scandinavian pastry, brunch pastry