Flaky Butter Croissants
There is something almost magical about pulling a tray of golden, flaky butter croissants from the oven. The kitchen fills with that warm, buttery aroma that wraps around you like a cozy blanket. The layers crackle softly as they cool, and when you tear one open, you see that delicate honeycomb texture inside. Trust me, you’re going to love this. It is one of those baking projects that feels impressive, yet so deeply comforting.
Why These Buttery Layers Are Worth Every Minute
If you have ever bitten into a perfectly crisp croissant with a tender, airy center, you already know the appeal. The outside shatters gently under your fingers, while the inside stays soft and rich with butter. It is that beautiful contrast that makes this recipe a total game-changer.
Making them at home gives you control over the quality of butter and the freshness, and let me tell you, it is worth every bite. You will taste the difference in every flaky layer.
A Little French History in Every Crescent
Croissants may be closely linked to French bakeries, but their roots trace back to Austria. The crescent shape was inspired by the Austrian kipferl, which eventually made its way to France and evolved into the laminated, buttery pastry we adore today.
Over time, French bakers refined the technique of folding butter into dough, creating those signature layers. Now, when you bake them in your own kitchen, you are continuing a tradition that has traveled across centuries and borders.
Why This Recipe Works So Beautifully Every Time
Before we dive into the details, let me share why this method is so reliable and satisfying.
Versatile: Enjoy them plain, fill them with jam, or turn them into savory sandwiches. They fit any mood or meal.
Budget-Friendly: Made with simple pantry staples like flour, milk, butter, and yeast, yet they taste bakery quality.
Quick and Easy: While laminating takes patience, the steps are clear and manageable if you follow them carefully.
Customizable: You can adjust sweetness, brush with egg wash for deeper color, or add fillings after baking.
Crowd-Pleasing: Few things impress guests like a basket of freshly baked croissants.
Make-Ahead Friendly: The shaped dough can rest overnight in the fridge before baking.
Great for Leftovers: Slightly day-old ones are perfect for French toast or bread pudding.
Secrets from My Kitchen to Yours
Let me tell you, the difference between good and unforgettable lies in the details.
- Keep your butter cold but pliable, it should bend without cracking.
- Chill the dough between folds so the butter does not melt into it.
- Roll evenly to ensure consistent layers.
- Do not rush proofing, proper rise creates that airy interior.
- Use good quality unsalted butter for rich flavor.
Tools That Make the Magic Happen
Having the right tools makes the process smoother and more enjoyable.
Rolling Pin: Essential for creating even layers during lamination.
Baking Sheet: A sturdy sheet ensures even baking.
Parchment Paper: Prevents sticking and helps with easy cleanup.
Sharp Knife or Pizza Cutter: For clean triangular cuts.
Pastry Brush: Perfect for applying egg wash evenly.
Ingredients That Build Those Beautiful Layers
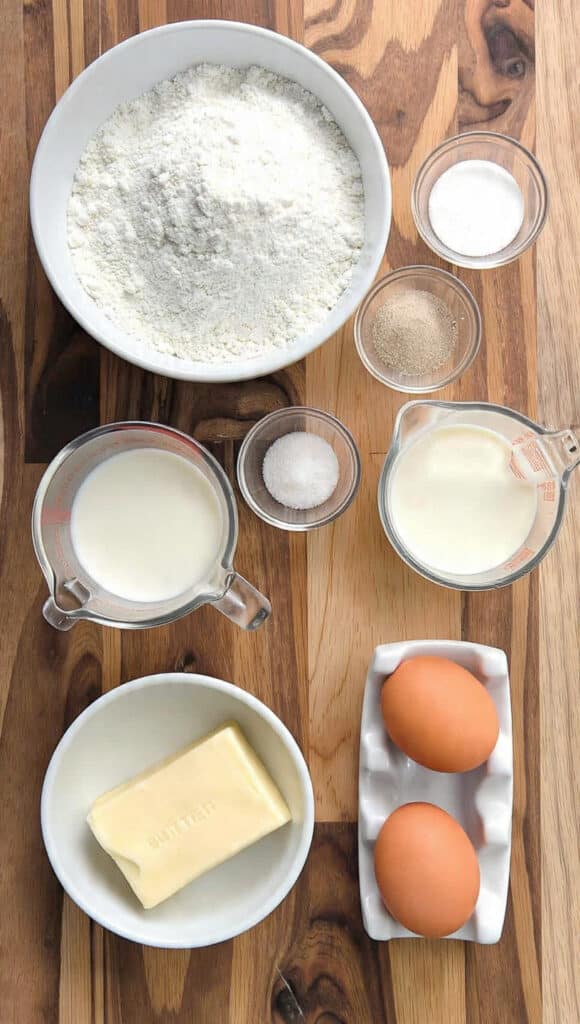
Every ingredient plays a specific role, and together they create that delicate structure we love.
- All-Purpose Flour: 4 cups or 500 grams, provides structure and strength for lamination.
- Granulated Sugar: 1/4 cup or 50 grams, adds a subtle sweetness and helps with browning.
- Salt: 2 teaspoons, balances flavor and strengthens gluten.
- Instant Yeast: 2 1/4 teaspoons or 7 grams, ensures a steady rise.
- Whole Milk: 1 1/4 cups or 300 milliliters, adds richness and tenderness.
- Unsalted Butter: 1 1/4 cups or 280 grams, cold, forms the flaky layers.
- Whole Eggs: 2 large eggs, one for the dough and one for egg wash.
Flexible Swaps If You Need Them
Sometimes you work with what you have, and that is perfectly fine.
Whole Milk: Can be replaced with 2 percent milk.
Unsalted Butter: Use high quality salted butter and reduce added salt slightly.
Instant Yeast: Active dry yeast works, just bloom it first in warm milk.
Spotlight on the Stars of the Show
Two ingredients truly define this bake.
Unsalted Butter: This is the heart of the layers. Its quality directly affects flavor and flakiness.
All-Purpose Flour: Strong enough to hold layers, yet soft enough for tenderness.
Let’s Bake Together Step by Step
Now let’s dive into the process. Take your time, enjoy the rhythm of rolling and folding, and remember, this one’s a total game-changer.
- Preheat Your Equipment: Preheat your oven to 400 degrees Fahrenheit or 200 degrees Celsius when ready to bake.
- Combine Ingredients: In a large bowl, mix flour, sugar, salt, and yeast. Add warm milk and one egg, then knead until a smooth dough forms.
- Prepare Your Cooking Vessel: Line a baking sheet with parchment paper and set aside.
- Assemble the Dish: Roll dough into a rectangle, place a cold butter slab in the center, fold the dough over, and roll out. Fold into thirds. Chill, then repeat folding two more times. Roll final dough to about 1/4 inch thick, cut into triangles, and roll into crescents.
- Cook to Perfection: Place shaped croissants on the baking sheet, proof until puffy, brush with beaten egg, and bake for 18 to 22 minutes until deep golden brown.
- Finishing Touches: Let them cool slightly so the layers set and the aroma settles.
- Serve and Enjoy: Tear one open while still warm and savor the crisp outside and soft interior.
Texture and Flavor, Layer by Layer
As they bake, the butter releases steam, separating each fold into delicate sheets. The exterior becomes crisp and deeply golden, while the inside stays airy and slightly chewy. The flavor develops from simple ingredients transforming into something rich, toasty, and almost nutty.
Extra Kitchen Wisdom for Perfect Results
A few small tips can elevate your results.
- Keep everything cold during lamination.
- Do not skip resting times.
- Brush egg wash gently to avoid deflating the dough.
- Bake until truly golden, pale croissants lack depth of flavor.
Common Mistakes and How to Fix Them
Even experienced bakers run into small issues, so here is what to watch for.
- Butter leaking during baking, chill dough longer before baking.
- Dense interior, allow more proofing time.
- Uneven browning, rotate the baking sheet halfway through.
A Quick Look at the Nutrition
Servings: 12 croissants
Calories per serving: 260
Note: These are approximate values.
Time Breakdown So You Can Plan Ahead
Prep Time: 45 minutes
Cook Time: 20 minutes
Total Time: 1 hour 5 minutes
Planning Ahead and Storing with Care
You can prepare the dough and complete all folds a day in advance, then shape and proof the next morning. Baked croissants stay fresh at room temperature for two days in an airtight container. They can also be frozen and reheated in the oven until crisp again.
Serving Ideas to Make Them Shine
Serve warm with fruit preserves, honey, or a smear of softened butter. Pair with coffee for breakfast or fill with scrambled eggs for brunch. They also shine alongside soups and salads.
Turning Extras into Something New
Day-old croissants make incredible French toast. You can cube them for bread pudding or use them for savory breakfast sandwiches.
Little Touches That Make a Difference
Store them uncovered for a few minutes after baking to keep the crust crisp. Reheat gently in the oven rather than the microwave to maintain flakiness.
Present Them Like a Bakery Pro
Arrange them in a woven basket lined with a simple cloth. A light dusting of powdered sugar can add charm if serving for brunch.
Creative Twists to Try
- Add a square of dark chocolate before rolling for a sweet surprise.
- Sprinkle sliced almonds on top before baking.
- Fill with almond cream after baking.
- Brush with honey for a glossy finish.
FAQ’s
Q1: Can I freeze the dough?
Yes, after shaping, freeze them on a tray and store in a sealed bag.
Q2: Why is my butter melting out?
The dough may be too warm, chill longer between folds.
Q3: Can I use margarine?
Butter gives the best flavor and layering, so it is recommended.
Q4: How do I know they are done?
They should be deeply golden and feel light when lifted.
Q5: Can I proof overnight?
Yes, refrigerate after shaping and bake in the morning.
Q6: Why are mine dense?
They likely need more proofing time.
Q7: Can I make them smaller?
Yes, simply cut smaller triangles.
Q8: Do I need a stand mixer?
No, kneading by hand works well.
Q9: How do I store leftovers?
Keep in an airtight container at room temperature.
Q10: Can I reheat them?
Yes, warm in the oven at 350 degrees Fahrenheit for a few minutes.
Conclusion
There is something deeply satisfying about mastering flaky butter croissants at home. The process feels almost meditative, and the reward is a tray of golden pastries that rival any bakery. Let me tell you, it is worth every bite. Once you make them from scratch, you will never look at store bought the same way again.
Print
Flaky Butter Croissants
- Total Time: 1 hour 5 minutes
- Yield: 12 croissants 1x
- Diet: Vegetarian
Description
Golden, flaky butter croissants with delicate airy layers and a crisp exterior. Perfect for breakfast, brunch, or a cozy afternoon treat, these homemade pastries bring bakery-quality flavor straight to your kitchen.
Ingredients
- 4 cups (500 grams) all-purpose flour
- 1/4 cup (50 grams) granulated sugar
- 2 teaspoons salt
- 2 1/4 teaspoons (7 grams) instant yeast
- 1 1/4 cups (300 milliliters) whole milk
- 1 1/4 cups (280 grams) unsalted butter, cold
- 2 large eggs
Instructions
- Preheat oven to 400 degrees Fahrenheit (200 degrees Celsius) when ready to bake.
- In a large bowl, combine flour, sugar, salt, and yeast. Add warm milk and one egg, then knead until a smooth dough forms.
- Line a baking sheet with parchment paper and set aside.
- Roll dough into a rectangle. Place a cold butter slab in the center, fold the dough over the butter, and roll out evenly. Fold into thirds. Chill, then repeat the folding process two more times. Roll the final dough to 1/4 inch thickness, cut into triangles, and roll into crescent shapes.
- Place shaped croissants on the prepared baking sheet. Allow to proof until puffy. Brush with the remaining beaten egg.
- Bake for 18 to 22 minutes until deep golden brown.
- Allow to cool slightly before serving.
Notes
- Keep the butter cold during lamination to ensure flaky layers.
- Allow enough proofing time for a light and airy texture.
- Rotate the baking sheet halfway through baking for even browning.
- Reheat in the oven to maintain crispness instead of using a microwave.
- Prep Time: 45 minutes
- Cook Time: 20 minutes
- Category: Breakfast
- Method: Baking
- Cuisine: French
Nutrition
- Serving Size: 1 croissant
- Calories: 260
- Sugar: 4 grams
- Sodium: 220 milligrams
- Fat: 15 grams
- Saturated Fat: 9 grams
- Unsaturated Fat: 5 grams
- Trans Fat: 0.5 grams
- Carbohydrates: 26 grams
- Fiber: 1 gram
- Protein: 5 grams
- Cholesterol: 55 milligrams
Keywords: flaky butter croissants, homemade croissants, french pastry, laminated dough, breakfast pastry