No-Bake Blackberry Oreo Tart
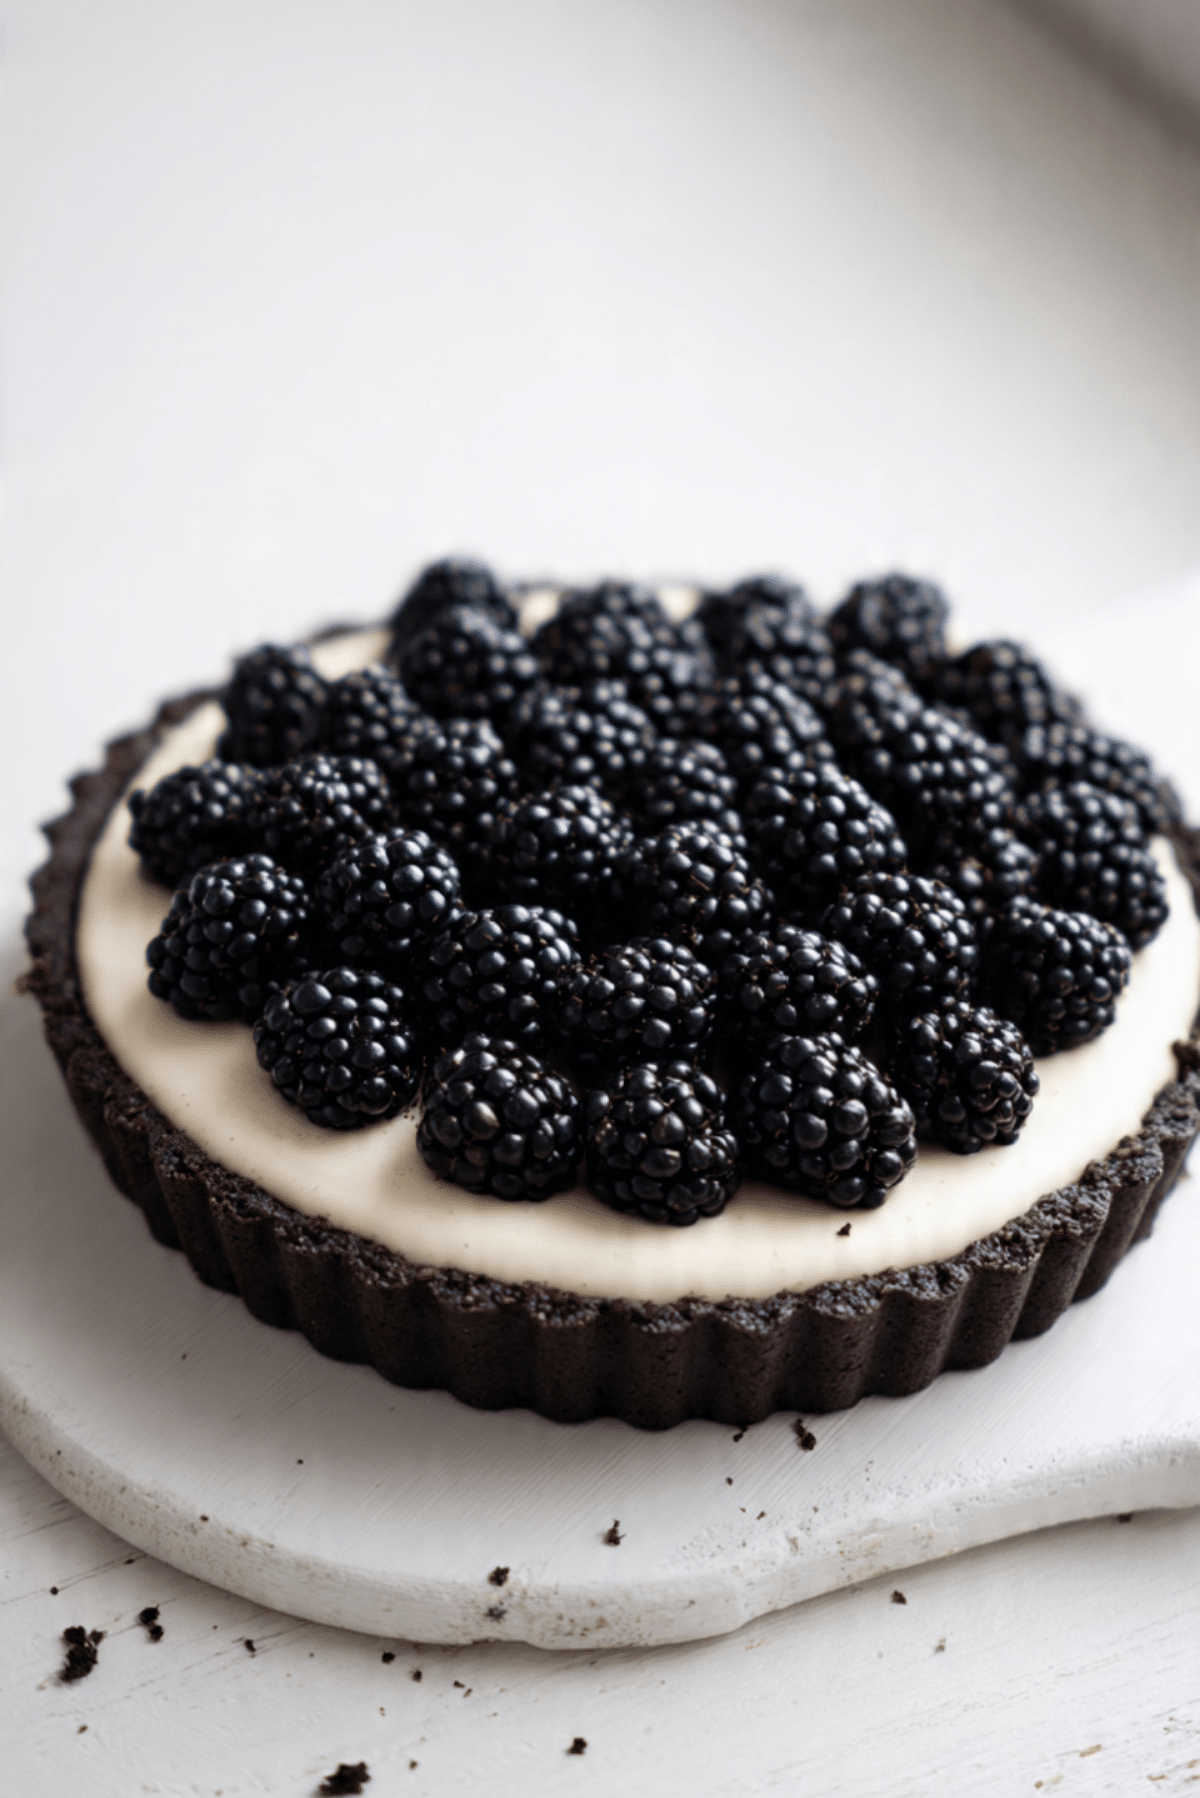
There is something magical about a dessert that looks elegant yet requires no oven at all. The first time I made this No-Bake Blackberry Oreo Tart, I remember how the deep chocolate crust contrasted with those glossy, juicy blackberries on top. It felt like something from a bakery window, yet it came together right in my own kitchen with surprisingly little effort. The creamy filling, the crunchy cookie base, and the fresh burst of berries create a balance that is simply irresistible. Trust me, you are going to love this.
A Stunning Dessert Without Turning on the Oven
This tart is rich but refreshing at the same time. The chocolate cookie crust is firm and slightly crisp, giving structure to the silky smooth filling. Then come the blackberries, fresh, slightly tart, and beautifully vibrant.
It is the kind of dessert that feels perfect for warm days, celebrations, or anytime you want something impressive without complicated steps. And now let’s dive into the story behind no bake desserts.
The Rise of No Bake Favorites
No bake desserts became popular for their simplicity and reliability. Without worrying about oven temperatures or overbaking, home bakers could focus on flavor and texture.
Combining crushed cookies with butter for a crust and layering creamy fillings on top is a method that has stood the test of time. Adding fresh fruit brings balance, freshness, and a natural pop of color.
Why This Tart Is Always a Hit
Before we crush cookies, here is why this recipe deserves a place in your collection.
Versatile: Swap blackberries for raspberries or strawberries.
Budget-Friendly: Made with simple store bought cookies and fresh fruit.
Quick and Easy: No baking required, just chill and serve.
Customizable: Add a chocolate drizzle or citrus zest.
Crowd-Pleasing: Chocolate and berries are a classic combination.
Make-Ahead Friendly: It needs chilling time, making it perfect to prepare ahead.
Great for Leftovers: The flavors deepen beautifully overnight.
Now let’s talk about creating that perfect crust and creamy layer.
Pro Tips for Perfect Texture
- Crush the cookies finely so the crust holds together well.
- Press the crust firmly into the pan for clean slices.
- Chill thoroughly before slicing.
- Use fresh, firm blackberries for the best presentation.
Kitchen Tools You Will Need
Food Processor: For finely crushing cookies.
Mixing Bowls: For blending the filling smoothly.
Springform or Tart Pan: Makes removal easy.
Spatula: For spreading filling evenly.
Refrigerator Space: Essential for setting the tart properly.
Ingredients You Will Need For This Elegant Tart
Each ingredient brings something special to the table.
- Oreo Cookies: 24 cookies, crushed finely for the crust.
- Unsalted Butter: 1/2 cup melted, binds the crust together.
- Cream Cheese: 8 ounces softened, creates a rich filling base.
- Powdered Sugar: 1 cup, sweetens the filling smoothly.
- Heavy Cream: 1 cup, whipped for light texture.
- Vanilla Extract: 1 teaspoon, adds warmth and depth.
- Fresh Blackberries: 2 cups, provide vibrant color and fresh flavor.
Easy Ingredient Substitutions
Oreo Cookies: Use any chocolate sandwich cookies.
Heavy Cream: Whipping cream works equally well.
Blackberries: Substitute with raspberries or sliced strawberries.
Spotlight on the Star Ingredient
Fresh Blackberries: Their natural tartness balances the sweetness of the filling, adding freshness and beautiful contrast.
Let’s Make It Step by Step
Now let’s bring this tart together.
- Preheat Your Equipment: No oven needed, prepare a 9 inch tart or springform pan.
- Combine Ingredients: Mix crushed Oreo cookies with melted butter until evenly coated.
- Prepare Your Cooking Vessel: Press the cookie mixture firmly into the bottom and slightly up the sides of the pan. Chill for 20 minutes.
- Assemble the Dish: Beat cream cheese and powdered sugar until smooth. Add vanilla extract. In a separate bowl, whip heavy cream to soft peaks, then gently fold into the cream cheese mixture.
- Cook to Perfection: Spread the filling evenly over the chilled crust and smooth the top.
- Finishing Touches: Arrange fresh blackberries evenly across the surface. Refrigerate for at least 4 hours until firm.
- Serve and Enjoy: Slice carefully and enjoy that creamy, chocolatey, berry filled bite.
A Beautiful Contrast of Texture and Flavor
The crust is slightly crisp and deeply chocolatey. The filling is smooth, creamy, and light. The blackberries add a juicy pop that cuts through the richness perfectly.
Helpful Tips for Best Results
- Chill the crust before adding filling.
- Use a sharp knife for clean slices.
- Pat blackberries dry before placing on top.
What to Avoid
- Do not skip chilling time.
- Avoid overwhipping the cream.
- Do not use overly soft berries.
Nutrition Overview
Servings: 10
Calories per serving: 430
Note: These are approximate values.
Time Breakdown
Prep Time: 25 minutes
Chill Time: 4 hours
Total Time: 4 hours 25 minutes
Make Ahead and Storage Tips
Store covered in the refrigerator for up to three days. This tart is best enjoyed chilled. It is not ideal for freezing due to the fresh fruit topping.
Serving Suggestions
Serve chilled with extra berries on the side. A light dusting of powdered sugar adds elegance. It pairs beautifully with coffee or tea.
Creative Leftover Ideas
Spoon leftovers into dessert cups for mini parfaits. Blend into a creamy milkshake style dessert. Use as a filling for layered dessert jars.
Additional Tips
Use full fat cream cheese for best texture. Always soften cream cheese before mixing. Chill overnight for even better structure.
Make It a Showstopper
Arrange berries in a neat circular pattern. Add a light chocolate drizzle for contrast. Serve on a white platter to highlight the dark crust and vibrant fruit.
Variations to Try
Add a thin layer of melted chocolate over the crust before filling. Mix lemon zest into the filling for brightness. Use mixed berries for colorful topping. Add a layer of berry jam beneath the cream layer.
FAQ’s
Q1: Can I use frozen blackberries?
Fresh is best, but thawed and drained berries can work.
Q2: How do I get clean slices?
Chill thoroughly and use a warm knife.
Q3: Can I make it ahead?
Yes, it is ideal for making a day in advance.
Q4: Can I freeze it?
Not recommended due to fresh fruit.
Q5: Can I use a pie dish?
Yes, but removal may be more difficult.
Q6: Is it very sweet?
It is balanced by the tart berries.
Q7: Can I add chocolate chips?
Yes, fold into the filling.
Q8: How long does it last?
Up to three days refrigerated.
Q9: Can I reduce sugar?
You can slightly reduce powdered sugar.
Q10: Is it good for summer?
Absolutely, it is refreshing and no bake.
Conclusion
This No-Bake Blackberry Oreo Tart is creamy, rich, and beautifully balanced with fresh berries on top. It looks impressive, tastes indulgent, and comes together with minimal effort. Once you make it, it will quickly become one of your favorite no bake desserts.
Print
No-Bake Blackberry Oreo Tart
- Total Time: 4 hours 25 minutes
- Yield: 10 servings 1x
- Diet: Vegetarian
Description
A rich and creamy no-bake blackberry Oreo tart with a chocolate cookie crust, silky cream cheese filling, and fresh juicy blackberries on top, perfect for an easy yet elegant dessert.
Ingredients
- 24 Oreo cookies, crushed finely
- 1/2 cup unsalted butter, melted
- 8 ounces cream cheese, softened
- 1 cup powdered sugar
- 1 cup heavy cream
- 1 teaspoon vanilla extract
- 2 cups fresh blackberries
Instructions
- Prepare a 9 inch tart or springform pan and set aside. No oven is required for this recipe.
- In a bowl, mix the finely crushed Oreo cookies with melted butter until evenly combined.
- Press the cookie mixture firmly into the bottom and slightly up the sides of the pan to form an even crust.
- Refrigerate the crust for 20 minutes to firm up.
- In a large bowl, beat softened cream cheese and powdered sugar until smooth and creamy.
- Add vanilla extract and mix until combined.
- In a separate bowl, whip heavy cream until soft peaks form.
- Gently fold the whipped cream into the cream cheese mixture until smooth and light.
- Spread the filling evenly over the chilled crust and smooth the top.
- Arrange fresh blackberries evenly over the surface.
- Refrigerate for at least 4 hours until fully set before slicing and serving.
Notes
- Press the crust firmly to ensure clean slices.
- Chill thoroughly before slicing for the best texture.
- Pat blackberries dry before placing on top to avoid excess moisture.
- Prep Time: 25 minutes
- Cook Time: 0 minutes
- Category: Dessert
- Method: No-Bake
- Cuisine: American
Nutrition
- Serving Size: 1 slice
- Calories: 430
- Sugar: 32g
- Sodium: 210mg
- Fat: 30g
- Saturated Fat: 17g
- Unsaturated Fat: 11g
- Trans Fat: 0g
- Carbohydrates: 38g
- Fiber: 3g
- Protein: 5g
- Cholesterol: 75mg
Keywords: no bake blackberry Oreo tart, blackberry chocolate tart, easy no bake dessert, Oreo crust tart, summer berry dessert