Sesame Balls with Taro
There is something magical about biting into a crisp golden shell and discovering a soft, sweet, and creamy center waiting inside. Sesame Balls with Taro bring that exact moment to life. The gentle crunch of toasted sesame seeds, the light chew of glutinous rice dough, and the smooth purple taro filling come together in a way that feels both comforting and a little bit special. Trust me, you are going to love this.
These little golden treats are often enjoyed warm, when the outer layer is still lightly crisp and the filling is silky and fragrant. Let me tell you, it is worth every bite.
A Crispy Outside and Creamy Center That Steals the Show
The first thing you notice is the sound. That faint crackle as your teeth break through the sesame-coated shell. Then comes the contrast, the chewy rice dough giving way to a creamy taro filling that is lightly sweet and earthy at the same time.
The sesame seeds toast beautifully during frying, releasing a nutty aroma that fills the kitchen. Meanwhile, the taro paste inside stays smooth and soft, almost like a delicate dessert cream but with more depth and character. It is this balance of textures and flavors that makes these so irresistible.
And now that we have talked about how they taste, let’s dive into where they come from.
A Sweet Bite Rooted in Tradition
Sesame balls, often known in many Asian cuisines, are commonly enjoyed during festive celebrations and family gatherings. They are especially popular during Lunar New Year, where their round shape symbolizes unity and completeness.
The addition of taro as a filling adds a unique twist. Taro has been used in both savory and sweet dishes across East and Southeast Asia for centuries. Its naturally starchy and slightly nutty flavor makes it perfect for desserts like this. Over time, creative home cooks began pairing the chewy rice dough with taro paste, creating a variation that feels both traditional and modern.
And that beautiful purple center, it always brings a little surprise to the table.
Why This Recipe Works So Well Every Time
Before we move into the kitchen, let me share why this one is a total game-changer.
Versatile: You can serve these as a dessert, a tea-time snack, or even as part of a festive platter. They fit in just about anywhere.
Budget-Friendly: The ingredients are simple and easy to find, which means you do not need anything fancy to create something impressive.
Quick and Easy: Once you understand the shaping technique, the process becomes smooth and surprisingly relaxing.
Customizable: You can adjust the sweetness of the taro filling to suit your taste or even experiment with other fillings later.
Crowd-Pleasing: Crispy outside and creamy inside, it is a texture combination that almost everyone enjoys.
Make-Ahead Friendly: You can prepare the filling in advance and store it in the refrigerator until ready to use.
Great for Leftovers: If you happen to have any left, they reheat beautifully and still taste amazing.
Now that you are convinced, let’s talk about how to make them truly perfect.
Chef Secrets for Perfectly Puffy Sesame Balls
A few small details make all the difference here.
- Make sure the oil temperature stays steady around 160 to 170 degrees C, which helps the balls expand slowly without cracking.
- Gently roll the balls while frying, this encourages even puffing and browning.
- Seal the dough carefully around the filling to prevent leaks.
- Do not overcrowd the pan, give them space to float and expand.
These simple tips will help you achieve that classic hollow center and evenly golden crust.
Tools That Make the Process Smooth
Before we dive into ingredients, here are a few helpful tools.
Mixing Bowl: For combining the dough ingredients smoothly.
Saucepan or Deep Frying Pot: Deep enough to allow the balls to float freely.
Slotted Spoon: To gently turn and remove the balls from hot oil.
Kitchen Thermometer: Helps maintain consistent frying temperature.
With everything ready, let’s look at what goes into these delightful bites.
Ingredients You Will Need For Sesame Balls with Taro
Each ingredient plays a specific role in building that signature texture and flavor.
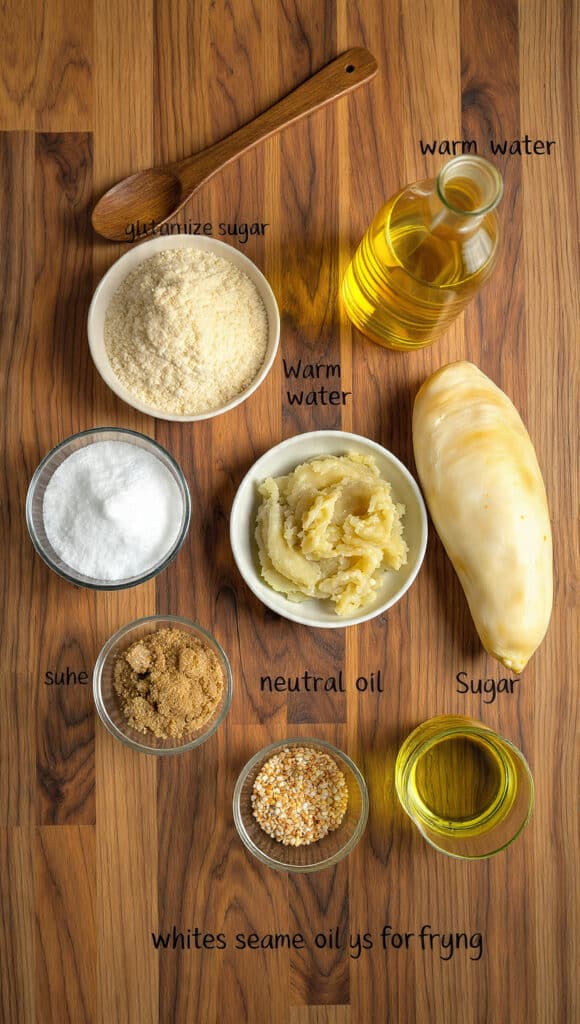
- Glutinous Rice Flour: 200 grams, this creates the chewy outer shell.
- Granulated Sugar: 50 grams, lightly sweetens the dough.
- Warm Water: 140 milliliters, binds the dough into a smooth, pliable texture.
- Taro Root: 250 grams, peeled and steamed, forms the creamy filling.
- Granulated Sugar for Filling: 40 grams, sweetens the taro paste.
- Neutral Cooking Oil: 1 tablespoon for the filling, keeps it smooth.
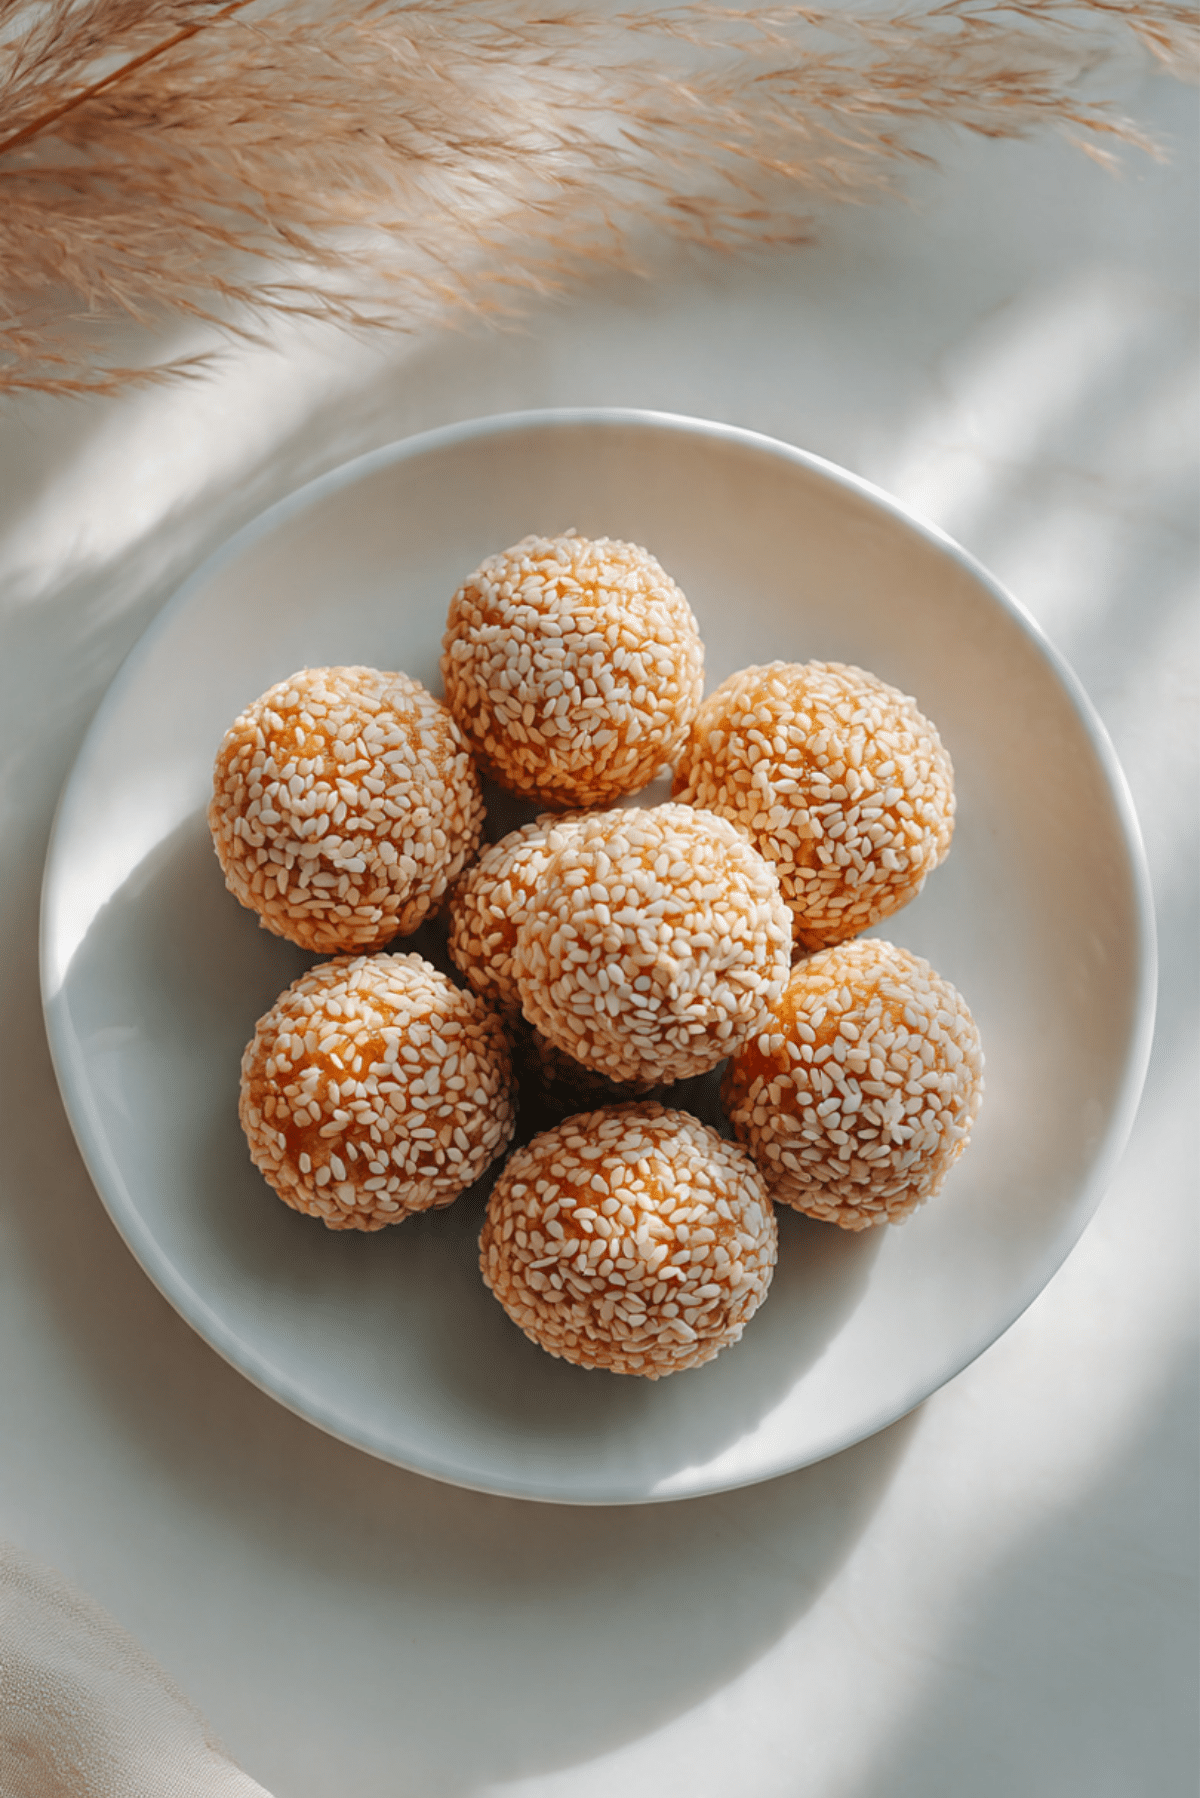
- White Sesame Seeds: 100 grams, coat the exterior for crunch and nutty flavor.
- Vegetable Oil for Frying: About 1 liter, for deep frying until golden.
Now that we have everything measured and ready, let’s explore some flexible swaps.
Simple Ingredient Swaps If Needed
Sometimes you work with what you have, and that is perfectly fine.
Taro Root: Mashed sweet potato for a different but delicious filling.
Granulated Sugar: Coconut sugar for a deeper sweetness.
White Sesame Seeds: Black sesame seeds for a striking visual contrast.
Now let’s spotlight what really makes these special.
The Star Ingredients That Make It Shine
Taro Root: This root vegetable turns creamy when cooked and has a subtly sweet, nutty flavor that makes the filling unique.
Glutinous Rice Flour: Despite the name, it contains no gluten. It gives the dough its signature chew and stretch.
And now, the fun part. Let’s get cooking.
Let’s Step Into the Kitchen Together
This is where everything comes alive. Follow these steps and enjoy the process.
- Preheat Your Equipment: Heat vegetable oil in a deep pot to about 165 degrees C and keep it steady.
- Combine Ingredients: In a bowl, mix glutinous rice flour and 50 grams sugar. Gradually add warm water and knead until a smooth dough forms. In another bowl, mash steamed taro with 40 grams sugar and 1 tablespoon neutral oil until creamy.
- Prepare Your Cooking Vessel: Pour sesame seeds into a shallow bowl for easy coating.
- Assemble the Dish: Divide dough into equal portions. Flatten each piece, add a spoonful of taro filling, seal tightly, and roll into a ball. Roll each ball in sesame seeds until fully coated.
- Cook to Perfection: Gently lower balls into warm oil. Fry slowly, turning gently, until they expand and turn golden brown, about 6 to 8 minutes.
- Finishing Touches: Remove with a slotted spoon and drain on paper towels.
- Serve and Enjoy: Let them cool slightly, then enjoy while still warm for the best texture.
That Perfect Balance of Crunch and Cream
As they fry, the dough puffs slightly, creating a delicate hollow space inside. The sesame seeds toast and release their aroma, while the taro filling stays soft and creamy.
The contrast between crisp shell and smooth center is what makes each bite exciting. The sweetness is gentle, never overpowering, allowing the nutty notes to shine through.
Helpful Tips for Best Results
If you want bakery-quality results at home, keep these in mind.
- Keep the oil temperature consistent to prevent bursting.
- Roll the balls gently during frying for even expansion.
- Make sure the filling is not too wet, which can cause cracks.
Common Mistakes and How to Fix Them
Even simple recipes have little traps.
- If the balls crack, the oil may be too hot. Lower the heat slightly.
- If they do not puff, the oil may be too cool. Increase temperature gently.
- If sesame seeds fall off, press them firmly onto the dough before frying.
Nutrition Snapshot
Servings: 12 pieces
Calories per serving: 180
Note: These are approximate values.
Time Breakdown for Easy Planning
Prep Time: 25 minutes
Cook Time: 15 minutes
Total Time: 40 minutes
Make-Ahead and Storage Tips
You can prepare the taro filling a day ahead and refrigerate it. Shape the balls and keep them covered until ready to fry.
Cooked sesame balls can be stored in an airtight container in the refrigerator for up to 2 days. Reheat in a warm oven to restore some crispness. Freezing uncooked shaped balls also works well, just fry directly from frozen at a slightly lower temperature.
Serving Ideas to Make It Special
Serve them warm with hot tea for a cozy afternoon treat. Arrange them on a platter with fresh fruit for a festive table. They also pair beautifully with light coconut-based desserts.
Creative Ways to Use Leftovers
If you have extras, slice them and add to a dessert platter. You can even warm and drizzle lightly with honey for a different twist.
Extra Tips for Flavor and Ease
A pinch of salt in the taro filling can enhance sweetness. Always seal the dough completely to avoid leaks. And most importantly, enjoy the process.
Make It Look Bakery-Worthy
Arrange the golden balls in a neat circle on a white plate. A simple presentation highlights their color and texture. The contrast between golden crust and purple center always catches attention.
Fun Variations to Try
- Add finely shredded coconut to the taro filling for extra texture.
- Use black sesame seeds for a dramatic look.
- Swap taro for red bean paste for a classic alternative.
- Add a tiny cube of mochi inside the filling for extra chew.
FAQ’s
Q1: Can I bake instead of fry?
Baking will not give the same puff and texture, but you can try at high heat. The result will be less crispy.
Q2: Why did my sesame balls collapse?
This can happen if the oil temperature changes too quickly.
Q3: Can I reduce the sugar?
Yes, adjust sweetness in the filling to your preference.
Q4: Is glutinous rice flour the same as regular flour?
No, it is made from sticky rice and gives a chewy texture.
Q5: Can I use canned taro paste?
Yes, just adjust sugar if it is already sweetened.
Q6: How do I know when they are done?
They will be evenly golden brown and feel light when lifted.
Q7: Can I make them smaller?
Yes, just reduce frying time slightly.
Q8: Do they need to be served warm?
They taste best warm but are still enjoyable at room temperature.
Q9: Can I air fry them?
Air frying may dry them out, deep frying gives best results.
Q10: How do I keep them crispy longer?
Drain well and avoid stacking while hot.
Conclusion
Sesame Balls with Taro are one of those treats that feel both nostalgic and exciting at the same time. Crispy, chewy, creamy, and just sweet enough, they bring texture and flavor together in the best way possible. Trust me, once you make them at home, you will want to share them with everyone. And honestly, this one is a total game-changer in the sweetest way.
Print
Sesame Balls with Taro
- Total Time: 40 minutes
- Yield: 12 pieces 1x
- Diet: Vegetarian
Description
Crispy golden sesame balls with a chewy glutinous rice shell and a smooth, lightly sweet taro filling inside. Perfect for festive gatherings or as a comforting homemade dessert.
Ingredients
- 200 grams glutinous rice flour
- 50 grams granulated sugar
- 140 milliliters warm water
- 250 grams taro root, peeled and steamed
- 40 grams granulated sugar for filling
- 1 tablespoon neutral cooking oil
- 100 grams white sesame seeds
- 1 liter vegetable oil for frying
Instructions
- Heat 1 liter vegetable oil in a deep pot to about 165 degrees C.
- In a mixing bowl, combine 200 grams glutinous rice flour and 50 grams granulated sugar. Gradually add 140 milliliters warm water and knead until a smooth dough forms.
- In another bowl, mash 250 grams steamed taro root with 40 grams granulated sugar and 1 tablespoon neutral cooking oil until smooth and creamy.
- Divide the dough into 12 equal portions. Flatten each portion, add a spoonful of taro filling, seal tightly, and roll into a smooth ball.
- Roll each ball in 100 grams white sesame seeds until fully coated, pressing gently so the seeds adhere.
- Carefully lower the balls into the warm oil. Fry for 6 to 8 minutes, gently turning them to ensure even puffing and golden browning.
- Remove with a slotted spoon and drain on paper towels. Let cool slightly before serving.
Notes
- Keep the oil temperature steady to prevent cracking or collapsing.
- Make sure the filling is not too wet to avoid leaks.
- Uncooked shaped balls can be frozen and fried directly from frozen at a slightly lower temperature.
- Prep Time: 25 minutes
- Cook Time: 15 minutes
- Category: Dessert
- Method: Deep Frying
- Cuisine: Asian
Nutrition
- Serving Size: 1 piece
- Calories: 180
- Sugar: 9g
- Sodium: 20mg
- Fat: 8g
- Saturated Fat: 1g
- Unsaturated Fat: 6g
- Trans Fat: 0g
- Carbohydrates: 25g
- Fiber: 2g
- Protein: 3g
- Cholesterol: 0mg
Keywords: sesame balls with taro, taro sesame balls, glutinous rice dessert, crispy sesame dessert, homemade taro treats