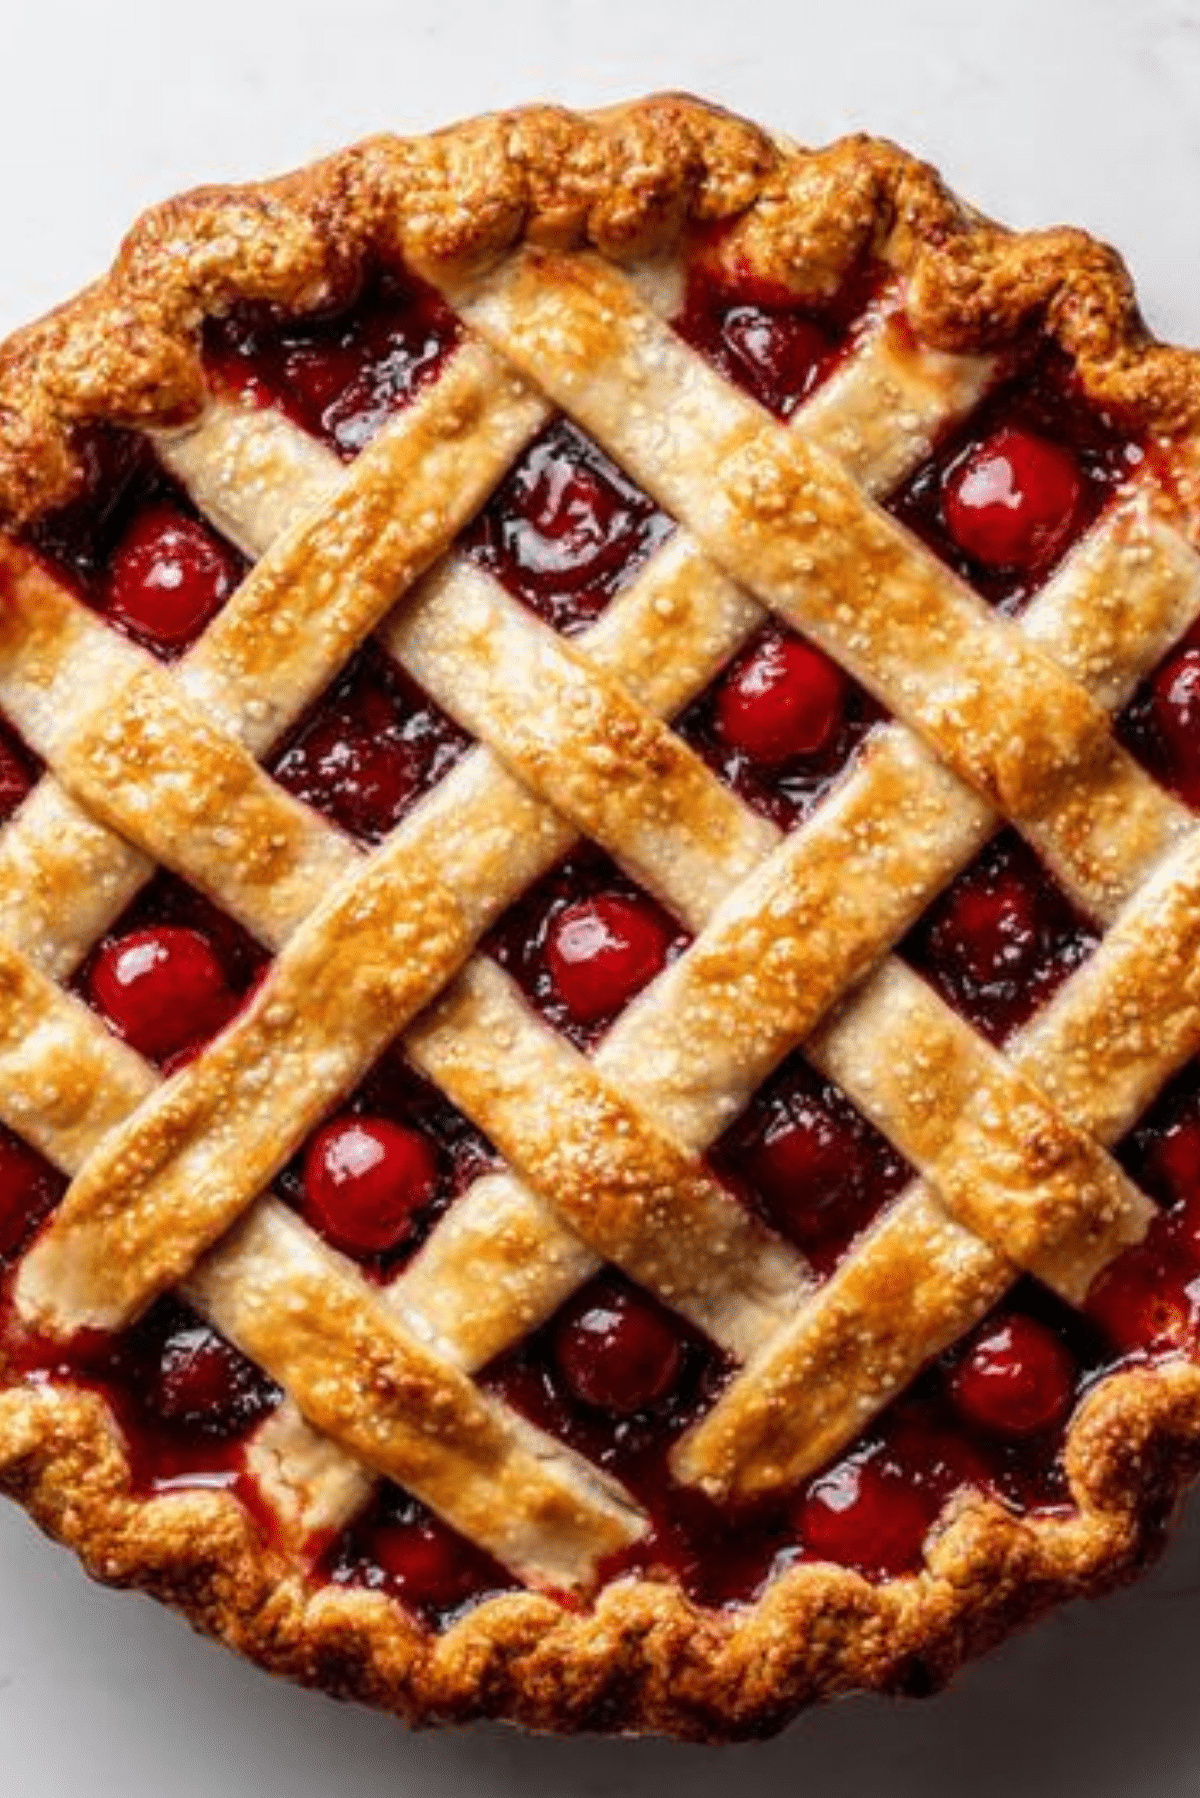
Classic Cherry Pie
There’s just something magical about a freshly baked cherry pie. The sweet-tart aroma wafting through the kitchen, the golden crust that shatters softly with each bite, and the glistening ruby red filling bubbling up from between the lattice weave. It’s the kind of dessert that turns any moment into a memory. Whether you’re pulling it from the oven on a lazy Sunday or bringing it to the table for a holiday gathering, a classic cherry pie always feels like home.
Behind the Recipe
Growing up, cherry pie was always the dessert that meant celebration. My grandmother would make it for birthdays, picnics, and any time she spotted cherries on sale at the market. She’d hum softly as she rolled out the dough, her hands dusted in flour, and the scent of cinnamon and vanilla would linger in the air. This version is a tribute to those cozy afternoons, with a touch of updated ease while keeping the heart of the original recipe intact.
Recipe Origin or Trivia
Did you know that cherry pie has deep roots in European traditions? Cherries have been baked into pies since the time of the Romans, but it was in England during the 1500s that cherry pie truly took shape. Queen Elizabeth I is even said to have enjoyed them! When European settlers came to America, they brought their love of fruit pies along, and soon cherries, especially tart ones, became a favorite in the Midwest. Michigan in particular is famous for its cherry orchards, making it a true pie-lover’s paradise.
Why You’ll Love Classic Cherry Pie
There’s a lot to adore about this timeless treat. Let me break it down for you:
Versatile: Enjoy it warm with ice cream or chilled as a midday indulgence.
Budget-Friendly: Uses basic pantry staples and seasonal fruit or canned cherries.
Quick and Easy: Minimal prep with a simple filling and pre-made or homemade crust.
Customizable: Add a hint of almond extract or a dash of cinnamon to switch up the flavor.
Crowd-Pleasing: It’s a showstopper at potlucks, holidays, or weekend dinners.
Make-Ahead Friendly: Bake it a day early and reheat or serve as-is.
Great for Leftovers: A slice the next morning? Even better than the night before.
Chef’s Pro Tips for Perfect Results
Want that pie to come out bakery-perfect every time? Here’s what I’ve learned over the years:
- Use cold butter for your crust to create those perfect flaky layers.
- If using canned cherries, go for sour cherries in water, not syrup.
- Add a bit of cornstarch to thicken the filling and avoid sogginess.
- Let the pie cool completely before slicing to help it set.
- Brush the top crust with an egg wash for that gorgeous golden sheen.
Kitchen Tools You’ll Need
Before diving in, make sure you have these essentials on hand:
Pie Dish: A 9-inch glass or ceramic pie dish works best for even baking.
Rolling Pin: For a smooth, even crust.
Mixing Bowls: You’ll need a few for mixing the filling and prepping the crust.
Pastry Brush: To apply the egg wash on top.
Knife or Pastry Cutter: For slicing and creating the lattice design.
Ingredients in Classic Cherry Pie
This pie is all about balance — sweet, tart, buttery, and crisp all in one. Here’s what you’ll need:
- Cherries (sour or sweet-tart): 5 cups pitted – They provide the bold, fruity filling with a pleasant tang.
- Granulated Sugar: 1 cup – Adds sweetness and balances the tartness of the cherries.
- Cornstarch: 4 tablespoons – Thickens the cherry juices as the pie bakes.
- Lemon Juice: 1 tablespoon – Brightens the flavor and adds a zesty touch.
- Vanilla Extract: 1 teaspoon – Adds a warm, sweet note to the filling.
- Almond Extract (optional): ¼ teaspoon – Enhances the cherry flavor beautifully.
- Pie Crust (homemade or store-bought): 2 rounds – One for the base and one for the lattice top.
- Unsalted Butter: 2 tablespoons – Dotted on top of the filling for richness.
- Egg (for egg wash): 1, beaten – Gives the top crust a shiny, golden finish.
- Coarse Sugar (optional): For sprinkling on the crust before baking.
Ingredient Substitutions
Life happens. Here’s how to swap ingredients if needed:
Cherries: Frozen cherries or canned sour cherries (drained) work well.
Cornstarch: Use arrowroot powder or tapioca starch.
Granulated Sugar: Coconut sugar or brown sugar for a deeper flavor.
Butter: Vegan butter for a dairy-free version.
Egg: Use milk or cream for brushing if avoiding eggs.
Ingredient Spotlight
Cherries: The soul of this pie. Sour cherries offer the best tart-sweet balance and bake up beautifully.
Cornstarch: It might seem simple, but it’s crucial for turning cherry juice into that luscious, sliceable filling.

Instructions for Making Classic Cherry Pie
Alright, time to roll up those sleeves. This is the part where the magic happens. Trust me, you’re going to love how your kitchen smells!
- Preheat Your Equipment:
Preheat your oven to 400°F (200°C) and place a rack in the lower third of the oven. - Combine Ingredients:
In a large bowl, mix the pitted cherries, sugar, cornstarch, lemon juice, vanilla extract, and almond extract (if using). Stir until the cherries are coated and the mixture looks glossy. - Prepare Your Cooking Vessel:
Roll out one pie crust and gently press it into your 9-inch pie dish, trimming the edges if needed. - Assemble the Dish:
Pour the cherry mixture into the crust. Dot with small pieces of butter. Roll out the second crust and cut into strips to form a lattice top or simply place the whole crust over and cut slits to vent. - Cook to Perfection:
Brush the top with beaten egg and sprinkle with coarse sugar. Bake for 20 minutes, then reduce temperature to 375°F (190°C) and bake for another 35–40 minutes or until the crust is golden and the filling is bubbling. - Finishing Touches:
Let the pie cool completely on a wire rack. This helps the filling set. - Serve and Enjoy:
Slice, serve, and don’t forget the scoop of vanilla ice cream on the side!
Texture & Flavor Secrets
The texture is what really makes this pie sing. That contrast between the crisp, buttery crust and the thick, juicy cherry filling is everything. As it bakes, the cornstarch thickens the natural cherry juices into a glossy, sweet-tart jam. And that golden crust? It adds just the right amount of crunch.
Cooking Tips & Tricks
Here are a few more tricks to make your pie shine:
- Chill your crust before baking to prevent shrinking.
- Use a pie shield or foil on the edges if they brown too quickly.
- Always bake on a baking sheet to catch any bubbling juices.
What to Avoid
Even the best bakers make mistakes. Here’s what to steer clear of:
- Overfilling the pie can cause spills and sogginess.
- Cutting the pie while warm will lead to a runny filling.
- Using too much cornstarch can make the filling gummy.
Nutrition Facts
Servings: 8
Calories per serving: 410
Note: These are approximate values.
Preparation Time
Prep Time: 30 minutes
Cook Time: 1 hour
Total Time: 1 hour 30 minutes
Make-Ahead and Storage Tips
You can make the pie a day ahead and store it at room temperature, loosely covered. For longer storage, refrigerate for up to 4 days. To freeze, wrap tightly in foil and freeze for up to 2 months. Reheat in the oven to revive the crisp crust.
How to Serve Classic Cherry Pie
Serve this pie slightly warm with a big scoop of vanilla ice cream or a dollop of whipped cream. It’s also lovely with a drizzle of chocolate or almond glaze. For a brunch twist, pair with coffee and a sprinkle of cinnamon.
Creative Leftover Transformations
If you’ve got leftovers (lucky you), here are a few fun ideas:
- Crumble it into a bowl of Greek yogurt for a fruity parfait.
- Use it as a filling in puff pastry turnovers.
- Blend with vanilla ice cream for an easy cherry pie milkshake.
Additional Tips
- For extra flavor, mix in a few blueberries or raspberries.
- A pinch of cinnamon or nutmeg adds warmth to the filling.
- Let the pie sit overnight for even better slicing and deeper flavor.
Make It a Showstopper
Presentation matters, especially for pies. Try a decorative lattice pattern or use cookie cutters for a fun crust design. Brushing with egg wash and sprinkling with sugar gives it that glossy bakery finish. Serve on a cake stand with fresh cherries nearby for a wow-worthy moment.
Variations to Try
- Mini Cherry Pies: Use a muffin tin for individual servings.
- Cherry Hand Pies: Perfect for on-the-go snacking.
- Chocolate Cherry Pie: Add chocolate chips to the filling.
- Spiced Cherry Pie: Infuse with cinnamon, cloves, or cardamom.
- Cherry-Almond Pie: Mix sliced almonds into the crust or topping.
FAQ’s
Q1: Can I use frozen cherries?
Yes, just thaw and drain them before using.
Q2: Do I need to blind bake the crust?
Not for this recipe, as the filling cooks along with the crust.
Q3: Can I make this gluten-free?
Absolutely. Use a gluten-free pie crust.
Q4: What’s the best way to pit cherries?
A cherry pitter is quick, but a straw or chopstick works in a pinch.
Q5: Can I use sweet cherries?
Yes, but reduce the sugar slightly to compensate.
Q6: How do I keep the bottom crust from getting soggy?
Chilling the pie before baking and using a glass pie dish helps.
Q7: Is almond extract necessary?
No, but it adds a nice depth of flavor.
Q8: Can I skip the lattice top?
Sure, just use a full crust and cut slits to vent.
Q9: Can I reheat slices?
Yes, pop them in the oven or microwave for a quick warm-up.
Q10: How long does the pie last?
About 4 days in the fridge or 2 months in the freezer.
Conclusion
Classic cherry pie is one of those desserts that brings everyone to the table with smiles and eager forks. From its beautiful golden crust to that juicy red filling, it’s a recipe that feels both comforting and special. Let me tell you, it’s worth every bite. So roll out that dough, pit those cherries, and make your own delicious memories.
Print
Classic Cherry Pie
- Total Time: 1 hour 30 minutes
- Yield: 1 pie (8 servings) 1x
- Diet: Vegetarian
Description
A golden, flaky classic cherry pie filled with juicy, sweet-tart cherries and a hint of vanilla, perfect for gatherings or a cozy treat at home.
Ingredients
- 5 cups pitted cherries (sour or sweet-tart)
- 1 cup granulated sugar
- 4 tablespoons cornstarch
- 1 tablespoon lemon juice
- 1 teaspoon vanilla extract
- 1/4 teaspoon almond extract (optional)
- 2 rounds pie crust (homemade or store-bought)
- 2 tablespoons unsalted butter
- 1 egg, beaten (for egg wash)
- Coarse sugar (optional, for topping)
Instructions
- Preheat oven to 400°F (200°C) and position rack in the lower third of the oven.
- In a bowl, mix cherries, sugar, cornstarch, lemon juice, vanilla, and almond extract until glossy.
- Line a 9-inch pie dish with one crust, trimming edges.
- Pour in the cherry mixture and dot with butter.
- Top with second crust (lattice or full), seal edges, and cut slits if using a full crust.
- Brush with egg wash and sprinkle with coarse sugar if desired.
- Bake for 20 minutes at 400°F, then reduce to 375°F and bake 35–40 minutes more.
- Cool completely on a wire rack before slicing.
Notes
- Use sour cherries in water for best results if using canned.
- Cool completely before slicing to help the filling set properly.
- To prevent burning, cover crust edges with foil halfway through baking.
- Serve with vanilla ice cream or whipped cream for an extra treat.
- Prep Time: 30 minutes
- Cook Time: 1 hour
- Category: Dessert
- Method: Baking
- Cuisine: American
Nutrition
- Serving Size: 1 slice
- Calories: 410
- Sugar: 32g
- Sodium: 160mg
- Fat: 18g
- Saturated Fat: 10g
- Unsaturated Fat: 6g
- Trans Fat: 0g
- Carbohydrates: 58g
- Fiber: 3g
- Protein: 4g
- Cholesterol: 40mg
Keywords: cherry pie, classic pie recipe, homemade cherry pie, dessert pie, fruit pie